
Completely foolproof No Knead Focaccia bread. It is so easy! Mix everything up in a bowl with a spoon, leave for a few hours, then bake!

💌 SAVE THIS RECIPE!
Watch out for more tasty treats coming your way! Unsubscribe at any time.
FEATURED COMMENT
"Well, now you are making me feel like a REAL BAKER!!! I tried making foccacia a few months ago using someone else's recipe and it was a BIG FAIL. This recipe of yours, as are all your other recipes is perfect! Thank you, Mel! I've never made such delicious "fancy-feeling" bread and the rosemary and flaked salt on top are ideal! " - Mandy ⭐️⭐️⭐️⭐️⭐️ More reviews →
Good bread is one of my favourite foods, especially fresh from the oven and slathered in my Easy Vegan Butter or dipped in good olive oil and balsamic vinegar.
I realize that when it comes to yeast and bread baking a lot of people are wary because they think it's not easy. And that can be right. Some breads are difficult to make. But, this easy focaccia is different. It is virtually foolproof. If you can put some ingredients in a bowl and stir them all together then you've got this!
The only hands-on time needed is a couple of minutes to mix the flour, yeast, salt, and water with a spoon, and later, a couple of minutes to scrape the dough into a pan and drizzle with olive oil then sprinkle with rosemary and salt. No kneading. No shaping.
You can mix it up before you go to bed at night and then bake it in the morning, or you can mix it up in the morning, head off to work, then bake it when you get home. Either way, you are this close to fresh Rosemary and Sea Salt Crusted Focaccia perfection!
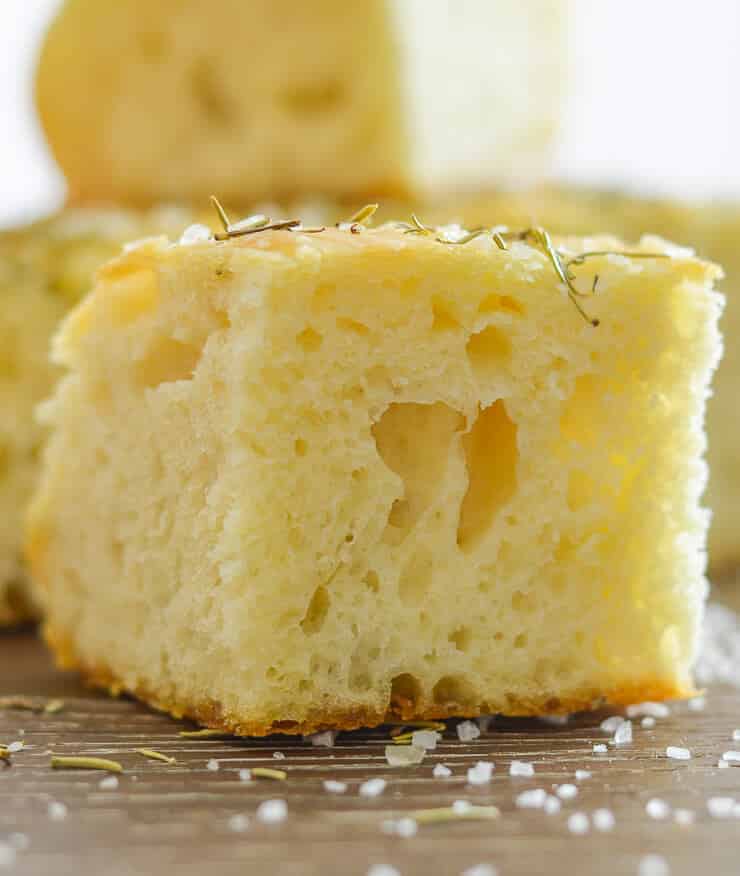
The rosemary-infused focaccia bread smell that permeates your house while this little miracle bakes is the stuff of dreams. It smells amazing! When you break into that salt and rosemary scattered crust you will find a soft and fluffy interior that is just begging you to eat it. All of it. Now!
If you love no-knead bread recipes check out my Easy No-Knead Vegan Dinner Rolls. They are so good and ridiculously easy too!
Mel x
Ingredients
Here is what you need at a glance, along with some important ingredient notes & substitution ideas:
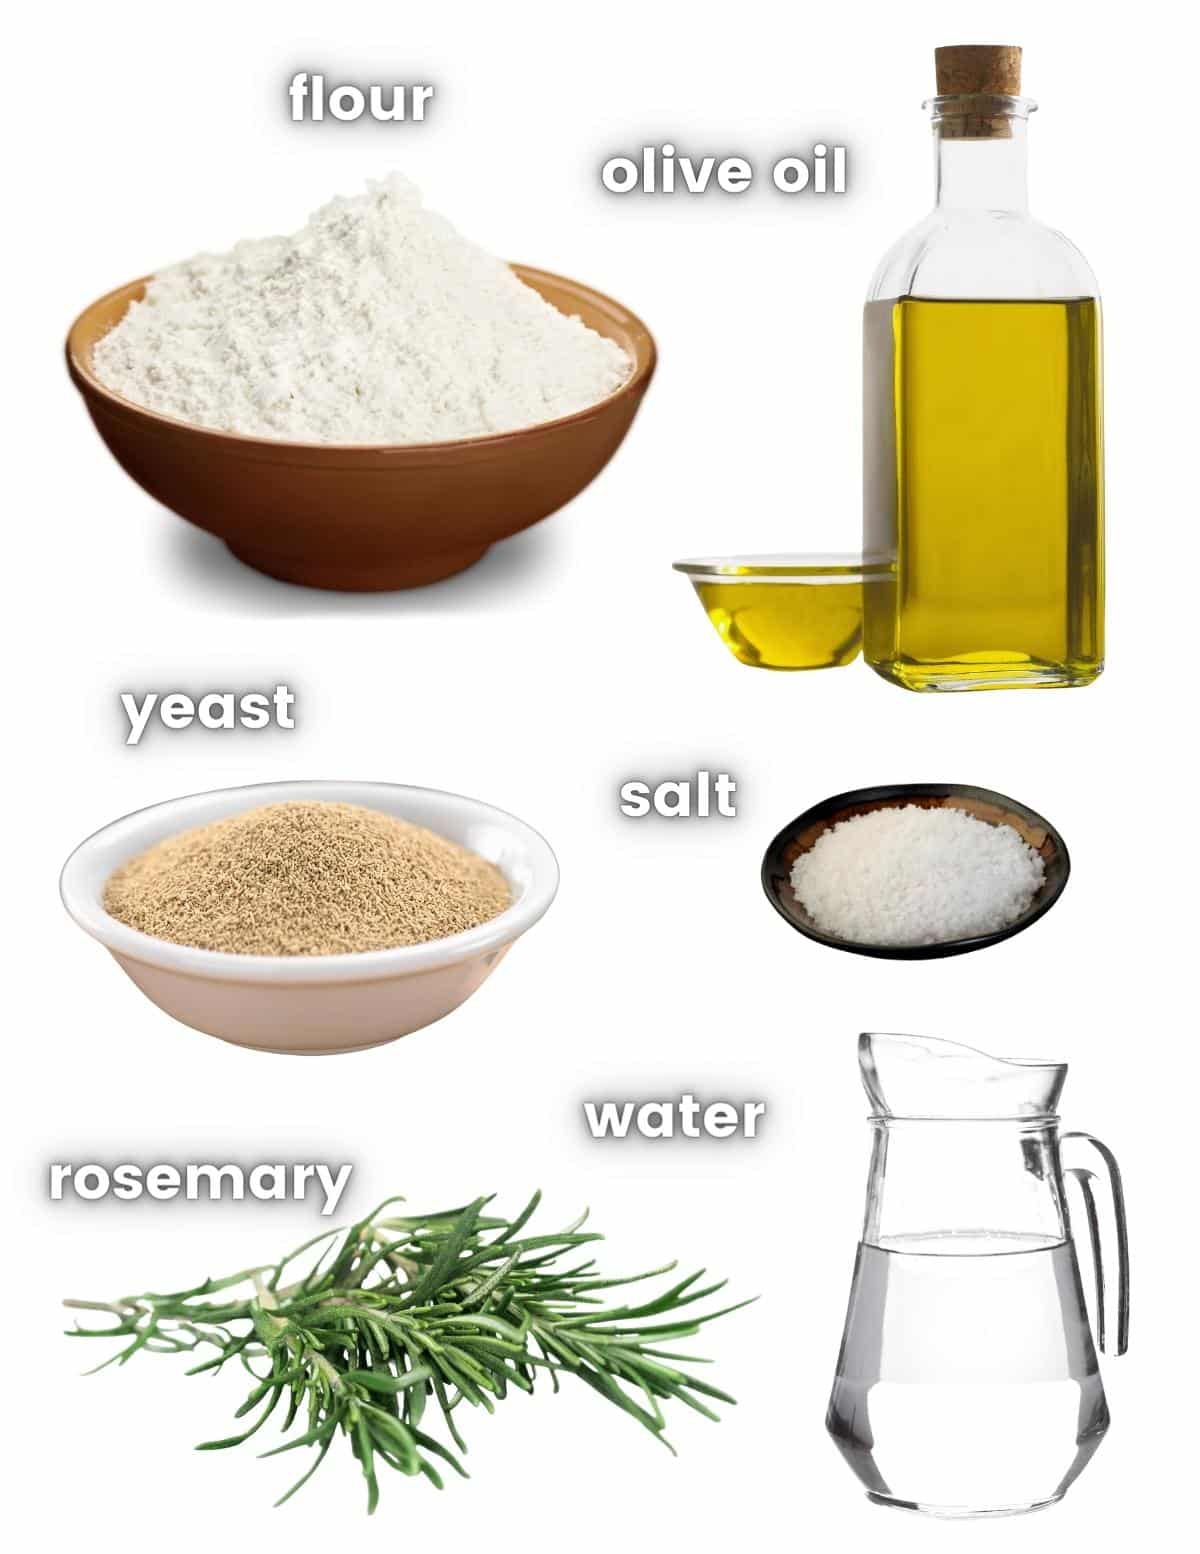
- Flour - You can use all-purpose flour or bread flour in this recipe. If you are in the UK you need to use strong flour. I have only tested this recipe with white flour. It might not work the same with wholewheat or spelt flour.
- Olive oil - I recommend using a good quality extra virgin olive oil for the best possible flavour.
- Yeast - You can use quick/fast action yeast or active dry yeast.
- Salt - I use fine sea salt in my recipes. If you use a salt that is not fine you will need to weigh it rather than use teaspoon measures as the volume is different. It's important to use the correct amount of salt in bread recipes because it can affect how the yeast works. I also like to sprinkle this focaccia with some good quality flaky salt for extra texture and flavour. Maldon Salt is my favourite for finishing bread/dishes.
- Rosemary - You can use fresh or dried. Fresh gives the best flavour though.
Let's Make No Knead Focaccia!
All you need to make Easy No Knead Focaccia Bread is a large bowl, a spoon, a metal pan (like an 8 x 8-inch square, or an 8 x 12 inch, or a round 8 or 9-inch cake pan), and some patience.
Here's how it's done in a few easy steps:
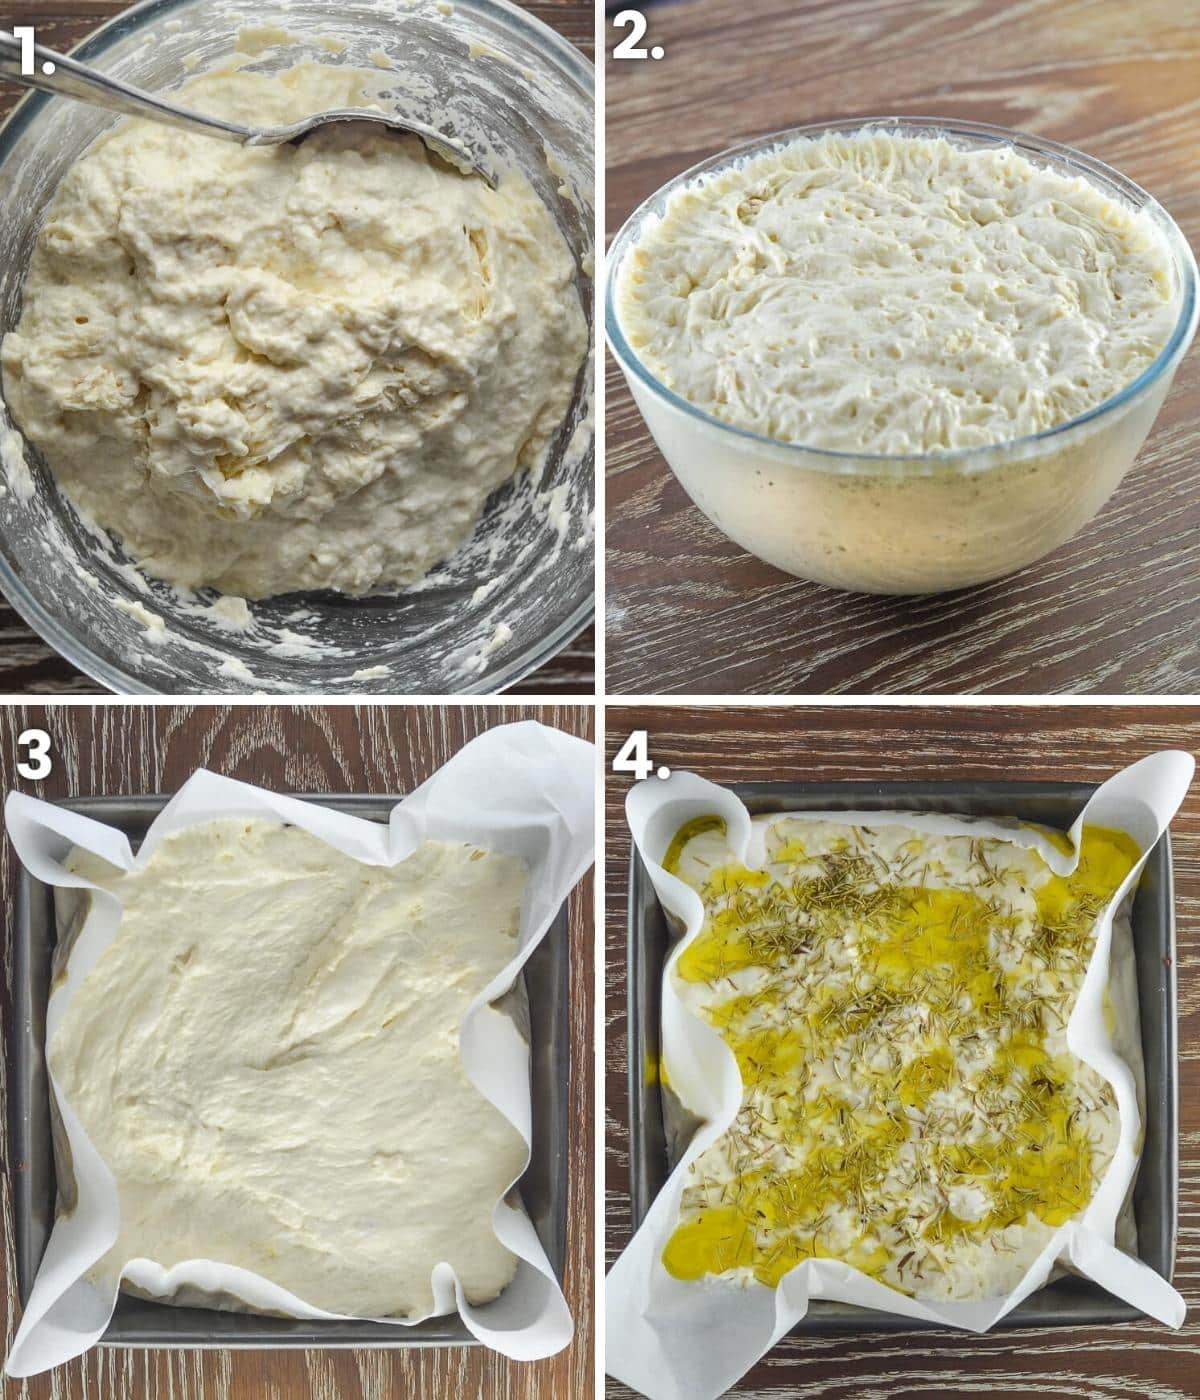
- Add everything to a bowl, starting with the dry ingredients and ending with the water. Mix it all up with a big spoon (I like to use a wooden spoon) to make a sticky, wet, slightly lumpy dough.
- Cover and leave at room temperature for about 8 hours. It will have risen and be full of air bubbles.
- Transfer the dough into the prepared pan. Just scrape/spoon it out with a silicone spatula or spoon.
- Dimple it with your fingers then pour over olive oil, sprinkle flaky sea salt and herbs and bake.
It really is that easy!
No Knead Bread Rising Tips
Because you aren't kneading the bread, time is needed to develop the gluten. The sweet spot is about 8 hours in a 20 °C (68 °F) kitchen but it's pretty flexible. You still get a good result if you bake it a little earlier or later.
If it is hotter where you are you can get away with less time. Use my progress pictures for a guide as to how it should look at each stage and judge accordingly when it's ready to bake.
You can extend the resting time if you need to by putting the bowl of dough in the fridge. You could probably get away with leaving it there for up to 24 to 48 hours dependent on your fridge's temperature. The lower temperatures slow down the activity of the yeast which helps to delay things.
If you try this though I advise keeping an eye on it the first time you do it, and baking it once it has just about doubled in size. Once you've done it once you'll have a good idea of how long you can get away with leaving it.
Flavour Variations
Go with the rosemary and sea salt option or switch things up. Some ideas include:
- Whole cherry tomatoes (poke them whole into the top of the dough) or large tomato slices & fresh basil.
- Roasted garlic cloves with rosemary or thyme.
- Pitted olives.
- Caramelized onions and fresh thyme.
- Melty vegan cheese.
- Roasted red pepper, swirls of pesto and vegan parmesan.
Serving Suggestions
This No Knead Rosemary Focaccia is wonderful served warm or cool and is great to serve at family dinners and holiday meals. It's also wonderful served as an appetizer with some good extra virgin olive oil and balsamic vinegar for dipping.
It makes the perfect accompaniment to pasta dishes like spaghetti and Vegan Marinara Sauce, my Vegan Vodka Sauce Pasta, soups like Vegan Potato Soup, Easy Tomato Basil Soup, or Red Lentil Soup with Lemon. Or stews and casseroles.
It is also great used to make sandwiches (try it with my White Bean & Artichoke Sandwich Filling or Spicy Chickpea Smash) and makes the most wonderful paninis.
Recipe

No Knead Focaccia
Author:WATCH HOW TO MAKE IT
Ingredients
- 4 cups (500 grams) all purpose flour or bread flour cups measured by spooning the flour into the cups and levelling off with the back of a knife - do not scoop and do not compact the flour down by pressing on it as you fill the cup (in the UK use strong bread flour)
- 1 tablespoon (10 grams) instant yeast or quick rise yeast , (if you only have active yeast see recipe notes)
- 2 teaspoons (10 grams) fine sea salt
- 5 tablespoons extra virgin olive oil , divided
- 1¾ cup plus 2 tablespoons (450 mls) water , (cold straight from the tap/faucet. Don't warm it up).
- 2 tablespoons rosemary , fresh or dried
- flaky sea salt for scattering
INSTRUCTIONS
- In a large mixing bowl combine the flour, yeast, and salt then add 1 tablespoon of olive oil and the water. Mix well until you can no longer see any dry flour and you have a wet, slightly lumpy-looking messy dough. Make sure to scrape right into the bottom of the bowl. (See my picture in the post above for reference).
- Cover with cling wrap, a clean shower cap or a wet dish towel and leave on the kitchen counter for a minimum of 6 hours and a maximum of 9 hours. Do not refrigerate and do not leave anywhere really warm. Just normal room temperature is fine.
- About 20 minutes before the time is up preheat your oven to 400°F (200°C) and line a cake pan or brownie pan with parchment paper. (any pan from 8 x 8 inch to 8 x 12 is fine or an 8 or 9-inch round cake pan - just ensure it's metal. Don't use silicone). You can even spread the dough out on a parchment paper- lined regular baking tray if that's all you have.
- When the oven is at temperature, scrape the dough out of the bowl and into the pan. I use a dough scraper but a silicone spatula or spoon will be fine. It will be clingy and sticky but that is normal.
- Once it's all in the pan, flatten it out so it's as even as you can get it all over, then using fingers dipped in olive oil, make dimples all over the top.
- Drizzle over the olive oil (be as generous as you feel comfortable with) and sprinkle on the rosemary and salt.
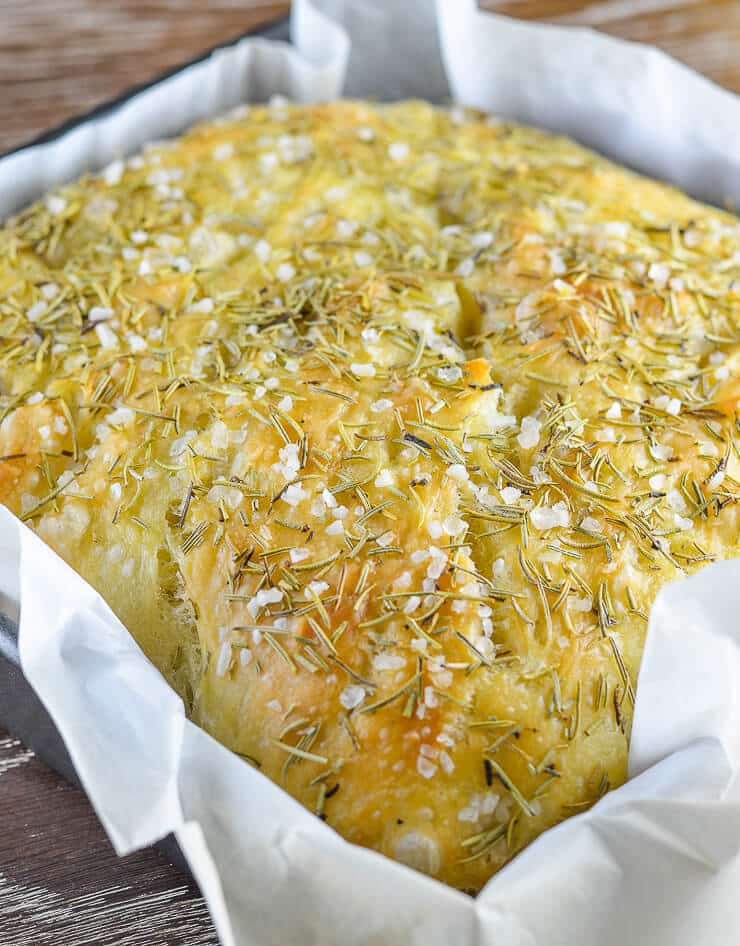
- Place in the preheated oven and bake for about 37 to 40 minutes or until golden brown.
- Remove from the oven, lift out using the paper as handles, and place on a wire rack. Leave to cool for at least 15 minutes before cutting.
NOTES
💌 SAVE THIS RECIPE!
Watch out for more tasty treats coming your way! Unsubscribe at any time.

Cindy says
Hi, I don't eat any oil - is there any substitute for the oil - maybe applesauce? or should I just find another recipe?
Thanks
June says
After travelling to Italy and falling in love with focaccia, I tried several recipes at home, and this is the one I keep coming back to as it is as easy as it gets, the focaccia always turns out great and my guests love it as much as I do. Thank you!
Melanie McDonald says
So pleased you’re enjoying the recipe, June!
Noelle says
I've made this what feels like a million times. It's so easy, and it turns out delicious every time!
Linda says
I love this recipe and have been making it weekly with my fresh garden herbs ❤️ I have been using regular yeast and just saw the note today…and it has been fine without activating! I will continue with not activating - just thought I would share that the recipe is forgiving as well as delicious :)
Lena says
Do you have any suggestions for making your recipe gluten free? My friend swears by this recipe, but was wondering if anyone tried it gluten free.
Melanie McDonald says
I'm sorry, I don't. I'd recommend finding an already gluten-free focaccia recipe rather than trying to adapt this one. I don't think it would work well if you just switched the flour for a gluten-free one. The amount of liquid needed and timings would definitely be very different. Food is too expensive to waste these days and I'd hate for you to end up with a disaster.
Mary says
Thank you for your response to this question about adjusting this recipe to make it GF! It was exactly what I needed to know! ❤️
Shannon says
Could I use a glass baking dish? I don't have a metal one? It looks delicious and I really want to make this!
Melanie McDonald says
I recommend using a metal pan if you've got it, but to be honest this recipe is so forgiving that I think it will still be great in glass. It will change the texture slightly though (it will be softer) and it might not get quite as puffy. Usually for a cake or brownies or something like that I'd recommend reducing the temperature a little, but because this is bread I think it will be fine baked at 400 as per the recipe. You may need to bake it for 5 to 10 minutes longer because glass takes a lot longer than metal to get to temperature. I hope that helps, and enjoy!
Shannon says
thank you so much! I will make it this weekend!
Amina says
Hi :) Can I use this recipe to keep the dough over night? Also, why do other focaccia recipes ask for honey? I’ve used this recipe many times for the same day but would like to do overnight dough. Please let me know if there’s anything different needed. Ty
Melanie McDonald says
The dough is left from anywhere between 6 to 9 hours so you can prep it before you go to bed and leave it overnight. As for why other recipes use honey, you'd need to ask them but I guess it's to add sweetness or to speed up fermentation or both. This recipe doesn't need any sweetener and in fact would not work as written if you were to add it because sugar would speed up fermentation and the times would need to be adjusted. Hope that helps!
Amina says
Good day :) yes thank you so much for getting back to me and explaining! That helps :) I did as you said and I made them in muffin the tray, they turned out amazingggg! Thank you again for this perfect recipe!
Decy says
Hello Mel!
My focaccia stick to the baking paper... (crying) :-(
And then I tried to bake another one, I sprayed oil on the baking paper. Didn't go very well.
I want to make another one, what to do? Should I just skip this baking paper?
And if I want to use sourdough starter, how many grams do I have to use?
Cheers,
Decy
Melanie McDonald says
I've never had that happen. Are you sure it's baking parchment paper and not wax paper? Wax paper is no good for baking like this and will stick like crazy. If it is parchment I'd buy a different brand. Maybe it's a poor quality parchment paper. I always use the Kirkland non-stick parchment paper and it's great. I've never had anything stick to it. Don't make this recipe without parchment paper. You'll really struggle to get it out of the pan.
Hope that helps!
Decy says
Hi,
in my country, Indonesia, baking paper is parchment paper.
I guess I need to find a good brand of the baking paper here.
Thanks for replying.
Oh if I want to use sourdough starter, how many grams do I have to use?
Melanie McDonald says
Oh sorry, I forgot to answer that part. This recipe hasn't been tested with sourdough starter. It would be a case of trial and error. Balancing the amount needed with the time to leave it would need testing so it's impossible to say.
Decy says
Alright, thanks for replying :-)
Hannah S says
When I’m having dinner guests, 9/10 times I plan our meal around this bread. It’s so simple but so delicious, it requires so little hands on time but really has such a wow factor with its delicious texture and flavor. I’ve probably made this at least 20 times now over the years, and it never lasts long!
Melanie McDonald says
Love to hear that, Hannah. Thank you so much for leaving a review!
Sandinwilson says
I’ve made this several using all purpose flour. Is there any difference in hydration if I use bread flour?
Melanie McDonald says
No, not with this recipe. Just use the amount called for and it will be great!
Kirsten says
I have made this focaccia probably around 30 times so far. It is fantastic and always a crowd pleaser. It’s also great as a base to add olives, sun dried tomatoes, all sorts of flavour combos. I love this recipe!
Krista Bowers says
Would this work with a gluten-free flour mix instead?
Melanie McDonald says
I've never tried it but I doubt it would turn out well.
Mandy says
My focaccia was delicious!!! "Was" being the operative word!! All gone now. Ive never had such "luck" in making what I think are quality bakery-style loaves and specialty breads. I have your "No-yeast white bread" in the oven now, another go-to recipe . Today I added some caraway seeds to the dough and topped with the recommended oatmeal but also added some raw shelled sunflower seeds too. Delicious! I've made this variation a few times now. Thanks Mel!
Melanie McDonald says
Love this Mandy! I'm so pleased you're enjoying my recipes. The caraway seed addition to the no yeast bread will be delicious I'm sure!
Mandy says
Well now you are making me feel like a REAL BAKER!!! I tried making foccacia a few months ago using someone else's recipe and it was a BIG FAIL. This recipe of yours, as are all your other recioes is perfect! Thank you Mel! I've never made such delicious "fancy-feeling" bread and the rosemary and flaked salt on top are ideal! I live really rurally now so don't have the luxury to just run down to the shop and pick up great breads and other vegan staples so I make nearly everything from scratch now. Empowering but sometimes, exhausting I liked when you said "all you need is a large bowl and some patience"! My partner said "well...you have a large bowl!" Hahaha! Thanks for another winner!