
A 5-ingredient, Easy Whole Wheat Bread recipe with very minimal hands-on time & no special ingredients needed. It's soft, fluffy, crusty, completely sugar-free, & unbelievably good! Perfect for beginners.

💌 SAVE THIS RECIPE!
Watch out for more tasty treats coming your way! Unsubscribe at any time.
FEATURED COMMENT
"It's the best bread recipe I've ever made!!! It's going to be my go to recipe...The crumb is perfect and it rose way over the rim of my large loaf pan to a golden brown crust. " - Michelle ⭐️⭐️⭐️⭐️⭐️ More reviews →
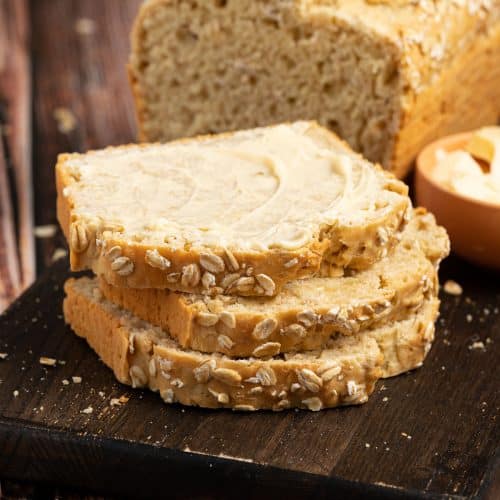
Imagine this... The smell of Whole Wheat Bread fills the air as it bakes in your oven...Breaking off a piece of the crust while it's still hot, slathering it in the most delicious Easy Vegan Butter...Devouring it.
Well, guess what? I have some really good news. This could be you in just a couple of hours.
Now, before panic sets in, bread and yeast do not have to be scary. So many people are daunted by it, and it's such a shame because baking bread and eating the result is one of life's true pleasures, and it really isn't difficult.
There really is nothing better than tucking into a loaf of warm, freshly baked bread that you, yes YOU, made all by yourself!
So many of you have made my No Knead Focaccia Bread and everyone starts off being sceptical of it. They think it can't possibly work because it is so incredibly easy. But it does. Every. Single. Time.
This Easy Whole Wheat Bread is a little step up from that, in that it takes a little more effort. But it's really not much more, especially if you own a stand mixer. But if you don't have a stand mixer, don't worry because you can knead the dough by hand and get exactly the same result. You just need to use a bit more elbow grease!
Mel x

This is why I am loving this Easy Whole Wheat Bread:
- Hands-on time is minimal.
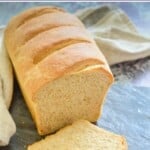
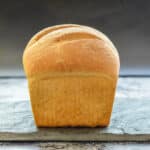
- It's light, fluffy and soft with a lovely crusty crust.
- The flavour is mild and nutty, and it doesn't taste too 'whole wheaty'.
- It only has 5 ingredients and is completely sugar-free.
- You won't find any additives or dough conditioners like in store-bought bread.
- It keeps well for a few days.
- You can double up the recipe and freeze one loaf for another day.
- It makes the best sandwiches, toast and soup or stew accompaniment!
Bread Pan Tip
I bake a lot of bread and have tried many, many loaf pans. My favourites by far are from USA Pan. Even after years of constant use, loaves and cakes never stick. I wipe a tiny bit of oil over the surface with kitchen paper, and whatever I am baking slides right out so easily.
How To Make Whole Wheat Bread
Here's a quick run-through of how to make your own homemade whole wheat bread:
1 - In a bowl, combine flour, yeast, salt, olive oil, and water.

2 - Mix together, then knead either by hand for about 10 minutes, or use a stand mixer.

3 - Lightly grease a bowl and leave the dough to double in size (it will take around 60-90 mins depending on the temperature of your kitchen).

4 - Shape the loaf and place it into the pan.

5 - Leave until risen to about 1 inch above the top of the pan.

6 - Score, then bake! You can do one long cut all the way down the length of the loaf or a few horizontal ones. You can bake it without scoring if you want to but then your bread will decide where its weak spot is and probably bust open as it expands. It will still taste good but might end up a bit misshapen. By scoring it you providing it with a weak spot to expand from and your loaf will look much prettier.

Baking Success Tip
As with all baking recipes, where precision is key to excellent results, I highly recommend using a kitchen scale to measure your ingredients, rather than using cup measurements. Cups are not an accurate way to measure, and you will not get the best or most consistent results when using them.
I love this scale because it is very reasonably priced and it has a tare function, which is really handy. It means you can place any bowl on the scale and reset to zero so it doesn't include the weight in its calculation, plus you can reset to zero when adding multiple ingredients to the same bowl, which saves on washing up.
Why This Loaf Is Perfect For Beginners
I call this loaf a Light Whole Wheat Bread because it uses a combination of white flour and whole wheat flour. By doing this, you get a much softer, lighter loaf, it's way easier to handle, and there isn't such a learning curve.
It's a great beginner's easy whole wheat bread because of this. If you use a greater ratio of whole wheat flour, your loaf won't be as light and fluffy, especially if you're a bread-baking novice.

Increasing The Percentage Of Wholewheat Flour
Perfect your making of this bread recipe as written, then if you want to, feel free to slowly increase the percentage of whole wheat flour as you become more experienced.
You can increase it as much as you need to suit your taste or dietary preferences. Bear in mind that you will need to increase the amount of water slightly as the amount of wholewheat flour increases (about 1 tablespoon (15ml) of extra water per extra cup (133 grams) of wholewheat flour that you use).
Recipe FAQs
Despite the common myth, the addition of sugar to bread dough is not necessary. There are enough natural sugars in the flour to feed the yeast and get a good result. That is why I do not include any in this recipe.
You can omit the oil from this recipe but bear in mind that oil or vegan butter makes the crumb softer and also acts as a preservative. If you don't add any your bread will be crustier and it won't keep as long before going stale.
It's so easy to make that there's really no need, but you absolutely can if you want to. As long as it physically fits that is. Bread-maker pan sizes are all different and a lot are pretty small. Much smaller than a standard loaf pan. So you might need to scale the recipe down to fit. This recipe will work fine if reduced by ¼, ⅓, or ½. Just make sure you're accurate with your calculations and use whatever the regular basic loaf setting is on your machine.
Recipe
Easy Whole Wheat Bread
Author:WATCH HOW TO MAKE IT
Ingredients
- 300g (2½ cups) all-purpose white flour or bread flour , (strong flour in the UK)
- 200g (1½ cups) whole wheat flour , (strong wholemeal flour in the UK)
- 10 grams (1 tablespoon) instant yeast or quick rise yeast
- 2 teaspoons fine sea salt
- 3 tablespoons olive oil , or any other neutral oil
- About 310mls (1⅓ cups) warm water , or cold water if you want it to take longer to rise.
RECOMMENDED EQUIPMENT
INSTRUCTIONS
- To a large bowl or stand mixer add both flours, the yeast, and the salt.
- Add the olive oil and the water. Turn on the stand mixer and knead the dough for 7 minutes. My Kitchen Aid manual recommends speed 2 for bread dough. You might need to stop the machine after a couple of minutes and scrape down the sides if it isn't catching all of the flour as it kneads. If it feels a little dry add a few drops more water. Add it very gradually though so you don't accidentally add too much. It should feel slightly tacky but not wet. If you are working by hand, stir the ingredients together with a spatula until a rough dough is made, then turn out onto a clean surface. Don't flour the surface. Instead rub some olive oil on it and on your hands. It will stop any sticking and means there is no chance of you adding too much extra flour which will affect the texture of your bread, making it dry and heavy. Knead for 10 to 15 minutes, until the dough is smooth, elastic. When you squeeze the ball of dough between both of your hands, it should bounce back. If you are unsure how to knead I recommend watching this video to help you perfect your technique.
- Once kneaded, grease a large bowl with a little oil, then put the kneaded dough in it and move it around to coat all over in a light coat of oil.
- Cover with a damp, clean dish towel ( I run mine under the tap for a minute then wring it out), and leave on the kitchen counter until doubled in size. The time this takes will vary depending on how warm your kitchen is, but bear in mind that the longer it takes to rise, the more flavor there will be in your finished loaf, so unless you are in a hurry, don't rush it by cranking up the heat or putting it somewhere very warm. Mine generally takes between 60 - 90 minutes to double in a 20°C kitchen.
- Once the dough has doubled, scrape it gently onto a clean, lightly oiled work surface.Try not to tear it. Use the heels of your hands to flatten it into a rectangle roughly the width of your bread pan.
- Fold the bottom third up and use the heel of your hand to push it down and seal it a bit. Then fold the top third down and push it down to seal it again. Then fold the dough in half again and pinch closed. Watch my video to see these steps. Gently turn under the ends if they look a little untidy then gently place in a lightly oiled bread pan. It will fit well into an 8.5 by 4.5 inch pan or a 9 x 5 inch pan.
- Rub a tiny bit of oil over the surface of the dough to stop sticking, then cover again with the damp dish towel and leave again until the bread dough is nicely domed and about 1 inch above the sides of the pan. It won't take as long this time. In my kitchen about 30 minutes.
- While you are waiting for your loaf to rise preheat your oven to 400° F (200°C).
- Once risen score the top of the loaf with a lame or very sharp knife. A serrated knife works well. If you've got kitchen scissors you can even cut it with those (you can do one long cut all the way down the middle, or several along the width). You can bake it without scoring but accept that the bread will then decide itself where the weak point is and it might split and look a bit unsymetrical and ugly.
- Place in the preheated oven and bake for 40 minutes. Slide out of the pan and cool on a cooling rack. You can check it's ready by tapping the loaf on the bottom with your fist as if you are knocking on a door. It should sound hollow.
- As hard as it is to resist eating it when fresh out of the oven it really is best to leave it to cool completely before cutting. Cutting while still warm affects the crumb and it will stale more quickly because the cut lets the steam out. You can solve this problem by doubling the recipe and making two loaves. One for eating while warm and one for later!
NOTES
💌 SAVE THIS RECIPE!
Watch out for more tasty treats coming your way! Unsubscribe at any time.

Lizzi says
Can I add small amount of honey to the ingredients with all the other ingredients before mixing ? Thanks
Melanie McDonald says
You can safely add a sweetener of choice. I sometimes add some maple syrup. Keep in mind that it will make the bread ferment a little faster and it will add a little extra moisture to the dough. As long as it's only a tablespoon or two though you shouldn't need to make any adjustments to the water quantity.
Vegan Susy says
I’ve had mixed results with whole wheat bread before because a lot of recipes turn out too dense, but this one actually looks soft and light enough to use for everyday sandwiches. The texture in the photos really surprised me for a 100% whole wheat loaf.
Also appreciate that the instructions seem detailed instead of assuming everyone already bakes bread regularly.
Jean-Marc says
Can I use my sourdough? Adjustment to the recipe?
Thanks.
Melanie McDonald says
The ingredients, method, and timings would need adjusting hugely. It could be done but it would be a whole new recipe.
Janice says
Hi Melanie, could I use all the wholewheat flour instead and any adjustment? Thank you.
Melanie McDonald says
That's covered in the post Janet. I recommend reading the sections "Why This Loaf Is Perfect For Beginners" and "Increasing The Percentage Of Wholewheat Flour". it will give you all the info you need. Hope you enjoy the recipe!
Sharon says
can I use regular yeast instead of instant yeast or quick rise?
Melanie McDonald says
Yes they are interchangeable. you'll just need to soak the active yeast in warm water for a few minutes before adding it. Just be sure to use water from the recipe and not any extra. It does tend to be a bit slower than instant/quick yeast though so allow for that with proofing.
Laurie says
this was great! I made it in the bread machine : ) I also added 2 tbsp dry milk powder (which I know isnt vegan!) but definitely made it extra fluffy too
Donna says
What settings did you use for this recipe on your breadmachine?? Thank you!
Donna says
Laurie, could you please say what settings you used when you make this in your breadmachine?? Thank you so much!!
Diane says
I was pleasantly surprised to find a dairy free bread recipe that slices up nicely and doesn't taste like cake!
I doubled the recipe and used dry active yeast instead of instant. Proofed the yeast with two pinches of sugar in warm water for about 10 to 15 minutes.
Then I added in all the other ingredients.
I used my kitchenaid mixer to knead the bread dough but had to add extra water to get the right consistency.
My second rise took a around 40 minutes before the dough was an inch above the pans.
The instructions and explanations were spot and this is now my #1 go to bread recipe.
Thanks for sharing! Hubby and kids approved!
Mae says
Going to try it today as long as I have all the ingredients
Nina says
Easy and quick to make. Tastes delicious.
Stephen Pudlock says
Hi
I have been making this recipe about every two weeks for a few months now and i love it.
How adaptable would/could this recipe be to using whole wheat flour and rye flour in the 60/40 proportions?
Please advise if and when you can
Thank you very much.
Melanie McDonald says
So pleased you're enjoying the recipe!
I'm pretty sure you would end up with a dry brick of a loaf if you used 60/40 WWF and rye without some pretty major adaptations. Rye flour doesn't contain gluten and it absorbs way more water than wheat flour. It also ferments a lot faster. You would be much better off finding a good well-rated recipe that already uses rye and wholewheat flour than trying to adapt this one and potentially wasting ingredients.
Having said that, you could probably get a decent loaf by using only 5 to 10% rye flour (no more) and a little extra water in this recipe. I wouldn't go further than that. Hope that helps!
Stephen Pudlock says
Hi Melanie
Thank you for your reply. I will not go that route, lol. I do, however, have another question. I read in a recent comment that someone used a little dry milk powder and the bread came out a little fluffier. That interests me enough to try it but all we have in the house is non sweetened almond milk. What would be a reasonable amount to try? For reference i have doubled the recipe and am using 700 ml's of water as we are at approximately 4700 feet of elevation in a relatively dry climate.
Please advise if and when you can
Thanks
Steve
Melanie McDonald says
The reason cow's milk powder is used in bread is because the lactose and fat in it tenderize the crumb and the sugars in it help brown the crust. Almond milk is 98% water so you'd just be wasting it in a brad recipe. It would not have the same effect. You would be much better off just using water and adding a tablespoon of olive oil and a tablespoon of sugar or maple syrup to the dough to get pretty much the same effect. This recipe is perfectly soft and fluffy without any additions though so it really isn't necessary. Hope that helps!
James Rinkevich says
Wouldn’t a glass loaf pan be better?
Melanie McDonald says
Metal pans are always better for bread ( and cakes/quick breads) which is why I recommend them in my recipes.
Metal pans, (especially ones with a light colour not black) heat up quickly and distribute heat evenly, which is really important for a good oven spring (rise) and a really nice crust.
Glass pans, are really good insulators, heat up slowly and retain heat longer, slowing the flow of heat between the oven's air and your dough/batter, leading to less oven spring, uneven baking and a softer crust.
A light coloured pan made from a metal that's an efficient heat conductor is always the very best choice. USA Pans are my preference if you’re looking at investing in some great bakeware. It’s all I use both personally and for recipe testing. They are really good quality pans, last a really long time, and bake everything perfectly.
If you do have and use glass pans you need to
assume all recipes (not just mine) are written for metal (unless they specify otherwise) and adjust your temp and bake time accordingly. You’ll need a lower temp (so whatever you’re baking doesn’t overcook on the edges before the centre gets cooked) and a longer bake time.
Hope that helps!
Marijke Fox says
This bread is delicious! The first recipe I tried where I actually ended up with a beautiful looking loaf that tastes great too!
Fatima says
I’ve made this bread several times now so it’s about time I wrote a review. As others have commented, it’s a really good tasting bread, easy to follow instructions and very forgiving. Have left it to overproof and still turned out pretty well. I’ve also had great success using some sourdough discard (excellent starter recipe from AVV). I’ve also made it as a no knead loaf, just a few stretch and folds needed. This is now my go to recipe for our toast bread. Thank you Mel for sharing this tasty recipe.
Luz says
Hi Mel, Can I use SPELT Flour instead the both flour you mentioned in your recipe?
Thanks in advance.
Melanie McDonald says
I have never tried this recipe with spelt flour. I’m pretty sure it will work ok but you will get very different results because spelt has a lower gluten content than wholewheat or all purpose flour and a unique gluten structure. It will make the crumb slightly denser and more crumbly. You also might need to adjust the amount of water a touch up or down so bear that in mind.
You would get a fluffier, stronger crumb if you used a mixture of spelt and all purpose/bread flour.
Hope this helps! I think I’ll test a yeasted spelt bread recipe. Thanks for the inspiration!
Swen says
Hi Mel, the all-purpose flour here in the more humid part of Australia is about 10% protein - you mentioned 'APF' or strong flour in the recipe - would our APF work with your recipe? I tried making bread with other recipes before with epic disastrous results (sticky stubborn mass of goo that became a feeble dough after desperately adding more flour to it, and running out of time I had to bake it - it ballooned beautifully in the oven but came out cake-like and crumbly in texture).
I've almost given up bread-making but am holding onto a glimmer of hope with your recipe. Kindly advise!
Melanie McDonald says
Our all purpose is about 12-13% protein. If I were you I’d buy strong/bread flour. I don’t think 10% will cut it. That would be the case for any of my yeasted or sourdough bread recipes.
You could make my no yeast white bread with your all purpose though.
Hope that helps and good luck!!
Swen says
Thank you so much for your advice, Mel - truly appreciate it! Wish I had known this before my previous bread attempt :)
Leonie says
Mel, made this bread and your baked beans. Followed both recipes exactly and OMG both Amazing!!! Typing this the next morning whilst eating some more thick slices of your bread toasted with Vegemite (yes i am from Australia) still Amazing. Thank you for all the time and effort you go to to produce recipes that i know will work if i follow them. Off now for some more toast.....
Melanie McDonald says
You’re very welcome!! There really is nothing better than homemade bread. I’m so pleased you had great results with the recipes! Enjoy your toast!
Kerstin says
I baked this bread today for my son. I personally do not eat any American bread, but tried it and have to say it is so good. My son loves French toast and I think this will fit the bill. His wife can make it for him.
Thank you, Kerstin
fan says
that's wonderful
Dolores says
It’s 7 pm I just took it out of the oven, it cooled down a little and I cut my husband's slice because he was waiting for the bread, I'm going to make it again, I liked it very much because few ingredients are used, I used only one and a half teaspoons of salt and it was better than if I had bought it, thank you for sharing the recipe
Demetria says
This is my first time making bread, but it will not be my last. It came out amazing. Thank you for sharing this easy-to-follow recipe!
Melanie McDonald says
I’m so pleased to hear that, Demetria! Thank you for leaving a review. It’s much appreciated!
alice says
It was my first time making bread at home - made a perfect magnificent loaf of bread, will keep making this!!!
Melanie McDonald says
That's great Alice - Well done! There'll be no stopping you now!
Helen says
I love making bread and rarely buy it, especially now as my partner has been diagnosed with diabetes. I have been making several sugar-free wholewheat breads, adapting my normal recipes, but this is by far the absolute best!! I have sliced it up and frozen it because I just wanted to try it out first (he's away trucking at the moment) and i'm on a strict low calorie diet for now. I will be making another loaf next week for when he gets home!!!!!
Melanie McDonald says
Thanks Helen, I hope he enjoys it too!
Gill says
Does this recipe work with gluten free flour please?
Melanie McDonald says
I've never tried but I doubt it. You would be much better off looking for an already gluten-free recipe to try rather than risking a failure with this one.