

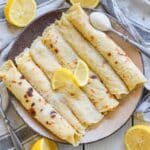
Homemade English Muffins. Soft, chewy, and full of nooks and crannies. No oven is required and they are so good for breakfast!

💌 SAVE THIS RECIPE!
Watch out for more tasty treats coming your way! Unsubscribe at any time.
Jump to:
I'm English and grew up eating English Muffins (and crumpets!) for breakfast and this is the recipe that's been in my family for decades. I love to make a big batch and freeze them for future easy breakfasts.
They do take a bit of time but that's nearly all hands-off, and they are so, SO, worth the wait. As Sally says in her 5-star review below "So puffy and light. They put shop ones to shame!" There really is no comparison.
Ingredients
Here is what you need at a glance, along with some ingredient notes and substitution suggestions:

- Flour - If you are in the US or Canada I recommend using all-purpose flour. The muffins turn out fluffier and puffier than they do with bread flour. In the UK flour has a lower protein content so you will need to use strong flour.
- Yeast - This recipe has been tested with instant yeast, sometimes labeled rapid, quick, or fast-action yeast. You can use active yeast if that's what you have at home but you will need to activate it first with the water and sugar from the recipe (not extra).
- Salt & sugar - Baking is a science, and both are essential in this recipe. If you omit them the yeast may not work as expected and you won't get the best results.
- Baking soda - Helps with the nooks and crannies which are an integral part of any English muffin!
- Oil - Any neutral liquid oil will work such as vegetable oil, canola oil, sunflower oil, avocado oil, light olive oil, etc. Melted refined coconut oil (not unrefined/virgin) will work well too, as long as your ingredients are all at room temperature. Oil is a fat and helps to produce a soft crumb. It also acts as a preservative.
- Cornmeal - This is optional and only for dusting, but it's a nice touch, makes the English muffins look authentic, and it helps avoid any sticking. Fine or coarse cornmeal is fine. If you don't have any you can also use semolina or just a bit of extra all-purpose flour.
Success Tip - If possible use a digital scale to weigh the flour. Cups are not an accurate way to measure and you will never get the best and most consistent results when using them. If you do use cups be sure to fill them correctly. Never scoop into the cup. Instead, fluff the flour with a fork then gently spoon it into the cup without shaking or compacting it down. Then level with a knife. Don't shake it down or compact it.
How To Make English Muffins
Can't wait to make homemade English Muffins? The full printable recipe is below, but first, let me walk you through each step so you can have success when it's your turn. If you are a visual learner be sure to watch my recipe video.
- First mix the flour, yeast, salt, sugar, and baking soda together. Add the oil and water and mix to form a shaggy dough.
- Knead until smooth, then cover and allow to rise.
- Roll out and cut out circles with a cookie cutter, then allow to rise until nice and puffy.
- Cook on a griddle or in a cast iron skillet over medium-low heat until deeply golden, flip and cook the other side.
Cooking them on a griddle (or in a heavy skillet) is what gives the English Muffins their beautifully golden tops and bottoms. And those beautifully golden tops and bottoms are what give them their distinctive chewiness. Watching them grow on the griddle is so fun too. They are like little puffy clouds!

How To Fork Split English Muffins
Before we talk about how to serve your English Muffins, how about we chat about fork splitting? And that's because English Muffins are all about creating maximum nooks and crannies for superior texture and butter catching, so it's important to use a fork to split them rather than a knife.
To fork split your English muffin simply stick a fork in the side of the muffin horizontally in the position you'd naturally start a cut. Stick it right in to bury the prongs then twist very slightly. Take it out and repeat this all the way around until the muffin is split.
That jagged and irregular fork-split surface toasts beautifully with extra golden, crunchy peaks, and the nooks and crannies hold the little pools of melted butter that will run down your chin as you're eating!
Serving Suggestions
Homemade English Muffins are just perfect while very fresh, eaten just as they are. Nothing can beat them right off the griddle! However, they really come into their English Muffin-ness properly when split and toasted. They make the perfect vehicle for all sorts of toppings. Some ideas for how to serve them include:
- Simply with vegan butter.
- With jam, vegan lemon curd, or apple butter.
- With vegan eggs Benny (there is a recipe in my cookbook).
- Turned into quick mini pizzas for the kiddos.
- Toast and top with your favourite toast toppings (avocado, vegan cheese, grilled tomatoes, mushrooms, etc.).
- To make breakfast sandwiches with vegan bacon, sausage, and vegan scrambled eggs or JustEgg.

Storage Tips
Store muffins in an airtight container or plastic bag at room temperature for 3 to 4 days. You can also freeze English Muffins for up to 3 months.
English Muffin Recipe FAQs
If you don't weigh the flour, or don't fill your measuring cups in the correct way then you can end up using too much flour. This will make your dough dry. See my tips in the post above about measuring accurately. It is so important, especially when making bread. If you live somewhere particularly warm and dry or you live at a high altitude then you may need to add more water to compensate. Add as much extra water as you need very gradually while mixing until a slightly tacky, smooth, supple dough is formed.
It depends. The temperature of your fridge will determine whether this is possible. In most fridges, it should be okay but your first time will be a bit of trial and error. Cover the dough well, then pop the dough in the fridge. In the morning remove it and let it warm up a little before proceeding. Or wait until doubled if it was retarded a little too much by the cold.
Yes, you can. If your starter is 100% hydration then it's all easy to calculate. Weigh your discard. Say for example it's 200 grams. That's 100 grams of flour and 100 grams of water. So deduct 100 grams of flour and 100 ml of water from this recipe, and use your discard instead. The other ingredients will remain the same and you will end up with extra puffy and delicious English muffins. If your starter is not 100% hydration you'll need to adjust that calculation accordingly.
Yes. Add all of the ingredients to the pan in the order specified by your manual. Usually, the water goes in first, followed by the flour then the other ingredients. Set to the dough setting. When finished remove and follow my instructions from the cutting part (step 8).
You can but I recommend not using more than 50% whole wheat flour so the muffins remain soft, fluffy, and light.
I have never tried to make this recipe gluten-free. I don't think that it would work well though. I'd recommend finding an already gluten-free English muffin recipe for the best results. This one from Minimalist Baker looks pretty good!
Recipe

Homemade English Muffins
Author:WATCH HOW TO MAKE IT
Ingredients
- 3 cups (375 grams) all purpose flour , (strong in the UK). Plus a little more for rolling.
- 2 teaspoons instant yeast , sometimes called quick or fast action yeast
- 2 teaspoons sugar , white or cane
- ½ teaspoon salt
- ½ teaspoon baking soda
- 2 tablespoons (30 mls) liquid oil , such as vegetable, canola, sunflower, or light olive oil.
- Approx 1 cup + 2 tablespoons (270 mls) warm water
- ⅓ cup (53 grams) cornmeal , or use more flour
INSTRUCTIONS
- If you have a stand mixer with a dough hook, add all ingredients (except the cornmeal) to the bowl and mix for around 7 - 10 minutes until the dough is smooth and elastic. Once it starts coming together give it a little poke and add a drop or two more water if it feels dry, giving it a chance to mix in between additions. You are looking for it to become a very slightly tacky-to-touch smooth, elastic, and pliable dough.
- If you don't have a stand mixer, add all of the dry ingredients to a large bowl. Mix then pour in the water and oil. Stir briefly adding more water drop by drop as required to form into a shaggy dough. Then tip out onto a clean surface rubbed with some oil (not flour). Rub some oil onto your hands and knead for about 10 minutes until the dough is smooth, elastic, and pliable. When kneaded properly, if you put your hands on either side of the ball of dough and squeeze inwards, it should bounce back slowly when you let go.
- Place the dough ball in a lightly oiled bowl and cover with a wet tea towel. Leave in a draft-free area until it has doubled in size (this usually takes about 1 hour in my kitchen). You will get the best flavor by not rushing it so I advise just leaving it on the kitchen counter and not moving it somewhere really warm to speed it up.
- While you're waiting, line a large baking sheet with parchment paper and sprinkle it generously with cornmeal.
- Once doubled in size, turn the dough out onto a lightly floured surface and roll it out with a rolling pin until about 1 inch thick and even all over. If it keeps springing back and is hard to roll, leave it to rest and relax for 5 minutes then try again.
- Use a 3-inch cookie cutter to cut rounds and place them gently on the prepared baking sheet. If you don't have a cookie cutter use the top of a glass or mug. Be sure to cut carefully and get as many as you can out of the first batch of rolled dough because the muffins are always slightly better than those made with the remaining dough.
- When you have cut as many as you can, ball up the remaining dough as gently as you can and re-roll it then cut out the remaining muffins.
- Sprinkle the tops of the muffins with more cornmeal (or flour) then cover with the damp tea towel and leave again until almost doubled in size. It won't take as long this time. Usually about 30 minutes.
- Heat a griddle, large cast iron pan, or large skillet/frying pan over medium-low heat. Leave it to preheat for a good 5 minutes. Don't use any oil.
- Place as many muffins as will fit comfortably (with sufficient room to turn them easily), VERY gently on the griddle. It's important to be as gentle as possible because you don't want to knock any of the air out of them.
- Cook undisturbed for 7 minutes until beautifully golden on the bottom. You need to have the heat just right so they can cook for long enough without burning. If you cook them too quickly they will get too dark before they are cooked through to the middle. Turn them down a bit if necessary. As they cook they will puff up like little balls.
- After 7 minutes turn them over gently and cook for another 5 - 6 minutes on the other side. Once they are a deep golden brown transfer to a wire rack and allow to cool. Repeat with the remaining muffins.
NOTES
💌 SAVE THIS RECIPE!
Watch out for more tasty treats coming your way! Unsubscribe at any time.

Cindy Lachance says
These came out very well. A few comments:
My yeast was old so I proofed it with the sweetened water as one would with many bread recipes.
I used English muffin rings, which turned out to be 3.5”, so my batch and a half yielded 9 very tall muffins. The rings probably weren’t necessary.
I set my electric skillet to 300 F., and cooked them for 7,6 minutes. Next time I’ll give them another minute or two. These are done, but barely so. The surfaces are the perfect color.
Good as these are, they’re a bit bland. Depending on one’s taste, some herb, an infused oil, chopped raisins or maybe finely grated cheese (if not needing to be strictly vegan) could be added.
Our vegan nephew is coming to visit. I’ll be very satisfied to put these out for breakfast with some preserves!
Jennifer says
Tried this recipe for the first time about a week ago and today I am making my third batch. My family loves these said that they are better than store bought.
Melanie McDonald says
Love to hear that Jennifer, and thank you for leaving a review. It's much appreciated!
Logan says
Can you use a gluten free flour instead? I used King Arthur measure for measure gluten free flour instead, and they didn’t rise very well or have a tough-ish consistency. I’m wondering if the flour cannot be subbed or if I did something else wrong.
Melanie McDonald says
This recipe (and my other yeasted bread recipes) need the gluten in the flour to work. If my recipes have been tested gluten-free like many of the cakes and muffins, gluten-free flour will be listed clearly as a substitution/alternative. It isn't in this recipe.
I just looked at the back of the bag of the Measure For Measure flour on an Amazon listing because I could zoom in to read it, and it doesn't say it's suitable for yeasted breads. It says it works for cookies, cake, quick breads, pancakes and pie crusts. I also confirmed this on King Arthur's website where it says it's not suitable for yeasted breads.I recommend finding a well-rated already gluten-free and vegan English muffin recipe rather than trying to convert one that isn't. Hope that helps!