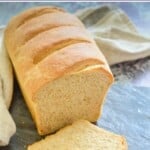

A 5-ingredient, Easy Whole Wheat Bread recipe with very minimal hands-on time & no special ingredients needed. It's soft, fluffy, crusty, completely sugar-free, & unbelievably good! Perfect for beginners.

💌 SAVE THIS RECIPE!
Watch out for more tasty treats coming your way! Unsubscribe at any time.
FEATURED COMMENT
"It's the best bread recipe I've ever made!!! It's going to be my go to recipe...The crumb is perfect and it rose way over the rim of my large loaf pan to a golden brown crust. " - Michelle ⭐️⭐️⭐️⭐️⭐️ More reviews →
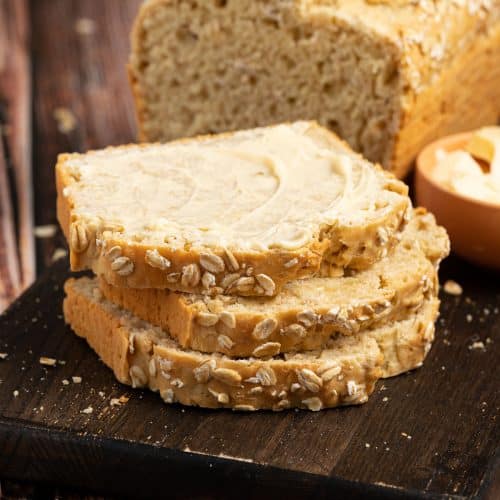
Imagine this... The smell of Whole Wheat Bread fills the air as it bakes in your oven...Breaking off a piece of the crust while it's still hot, slathering it in the most delicious Easy Vegan Butter...Devouring it.
Well, guess what? I have some really good news. This could be you in just a couple of hours.
Now, before panic sets in, bread and yeast do not have to be scary. So many people are daunted by it, and it's such a shame because baking bread and eating the result is one of life's true pleasures, and it really isn't difficult.
There really is nothing better than tucking into a loaf of warm, freshly baked bread that you, yes YOU, made all by yourself!
So many of you have made my No Knead Focaccia Bread and everyone starts off being sceptical of it. They think it can't possibly work because it is so incredibly easy. But it does. Every. Single. Time.
This Easy Whole Wheat Bread is a little step up from that, in that it takes a little more effort. But it's really not much more, especially if you own a stand mixer. But if you don't have a stand mixer, don't worry because you can knead the dough by hand and get exactly the same result. You just need to use a bit more elbow grease!
Mel x

This is why I am loving this Easy Whole Wheat Bread:
- Hands-on time is minimal.
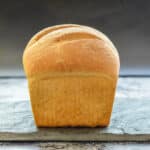
- It's light, fluffy and soft with a lovely crusty crust.
- The flavour is mild and nutty, and it doesn't taste too 'whole wheaty'.
- It only has 5 ingredients and is completely sugar-free.
- You won't find any additives or dough conditioners like in store-bought bread.
- It keeps well for a few days.
- You can double up the recipe and freeze one loaf for another day.
- It makes the best sandwiches, toast and soup or stew accompaniment!
Bread Pan Tip
I bake a lot of bread and have tried many, many loaf pans. My favourites by far are from USA Pan. Even after years of constant use, loaves and cakes never stick. I wipe a tiny bit of oil over the surface with kitchen paper, and whatever I am baking slides right out so easily.
How To Make Whole Wheat Bread
Here's a quick run-through of how to make your own homemade whole wheat bread:
1 - In a bowl, combine flour, yeast, salt, olive oil, and water.

2 - Mix together, then knead either by hand for about 10 minutes, or use a stand mixer.

3 - Lightly grease a bowl and leave the dough to double in size (it will take around 60-90 mins depending on the temperature of your kitchen).

4 - Shape the loaf and place it into the pan.

5 - Leave until risen to about 1 inch above the top of the pan.

6 - Score, then bake! You can do one long cut all the way down the length of the loaf or a few horizontal ones. You can bake it without scoring if you want to but then your bread will decide where its weak spot is and probably bust open as it expands. It will still taste good but might end up a bit misshapen. By scoring it you providing it with a weak spot to expand from and your loaf will look much prettier.

Baking Success Tip
As with all baking recipes, where precision is key to excellent results, I highly recommend using a kitchen scale to measure your ingredients, rather than using cup measurements. Cups are not an accurate way to measure, and you will not get the best or most consistent results when using them.
I love this scale because it is very reasonably priced and it has a tare function, which is really handy. It means you can place any bowl on the scale and reset to zero so it doesn't include the weight in its calculation, plus you can reset to zero when adding multiple ingredients to the same bowl, which saves on washing up.
Why This Loaf Is Perfect For Beginners
I call this loaf a Light Whole Wheat Bread because it uses a combination of white flour and whole wheat flour. By doing this, you get a much softer, lighter loaf, it's way easier to handle, and there isn't such a learning curve.
It's a great beginner's easy whole wheat bread because of this. If you use a greater ratio of whole wheat flour, your loaf won't be as light and fluffy, especially if you're a bread-baking novice.

Increasing The Percentage Of Wholewheat Flour
Perfect your making of this bread recipe as written, then if you want to, feel free to slowly increase the percentage of whole wheat flour as you become more experienced.
You can increase it as much as you need to suit your taste or dietary preferences. Bear in mind that you will need to increase the amount of water slightly as the amount of wholewheat flour increases (about 1 tablespoon (15ml) of extra water per extra cup (133 grams) of wholewheat flour that you use).
Recipe FAQs
Despite the common myth, the addition of sugar to bread dough is not necessary. There are enough natural sugars in the flour to feed the yeast and get a good result. That is why I do not include any in this recipe.
You can omit the oil from this recipe but bear in mind that oil or vegan butter makes the crumb softer and also acts as a preservative. If you don't add any your bread will be crustier and it won't keep as long before going stale.
It's so easy to make that there's really no need, but you absolutely can if you want to. As long as it physically fits that is. Bread-maker pan sizes are all different and a lot are pretty small. Much smaller than a standard loaf pan. So you might need to scale the recipe down to fit. This recipe will work fine if reduced by ¼, ⅓, or ½. Just make sure you're accurate with your calculations and use whatever the regular basic loaf setting is on your machine.
Recipe
Easy Whole Wheat Bread
Author:WATCH HOW TO MAKE IT
Ingredients
- 300g (2½ cups) all-purpose white flour or bread flour , (strong flour in the UK)
- 200g (1½ cups) whole wheat flour , (strong wholemeal flour in the UK)
- 10 grams (1 tablespoon) instant yeast or quick rise yeast
- 2 teaspoons fine sea salt
- 3 tablespoons olive oil , or any other neutral oil
- About 310mls (1⅓ cups) warm water , or cold water if you want it to take longer to rise.
RECOMMENDED EQUIPMENT
INSTRUCTIONS
- To a large bowl or stand mixer add both flours, the yeast, and the salt.
- Add the olive oil and the water. Turn on the stand mixer and knead the dough for 7 minutes. My Kitchen Aid manual recommends speed 2 for bread dough. You might need to stop the machine after a couple of minutes and scrape down the sides if it isn't catching all of the flour as it kneads. If it feels a little dry add a few drops more water. Add it very gradually though so you don't accidentally add too much. It should feel slightly tacky but not wet. If you are working by hand, stir the ingredients together with a spatula until a rough dough is made, then turn out onto a clean surface. Don't flour the surface. Instead rub some olive oil on it and on your hands. It will stop any sticking and means there is no chance of you adding too much extra flour which will affect the texture of your bread, making it dry and heavy. Knead for 10 to 15 minutes, until the dough is smooth, elastic. When you squeeze the ball of dough between both of your hands, it should bounce back. If you are unsure how to knead I recommend watching this video to help you perfect your technique.
- Once kneaded, grease a large bowl with a little oil, then put the kneaded dough in it and move it around to coat all over in a light coat of oil.
- Cover with a damp, clean dish towel ( I run mine under the tap for a minute then wring it out), and leave on the kitchen counter until doubled in size. The time this takes will vary depending on how warm your kitchen is, but bear in mind that the longer it takes to rise, the more flavor there will be in your finished loaf, so unless you are in a hurry, don't rush it by cranking up the heat or putting it somewhere very warm. Mine generally takes between 60 - 90 minutes to double in a 20°C kitchen.
- Once the dough has doubled, scrape it gently onto a clean, lightly oiled work surface.Try not to tear it. Use the heels of your hands to flatten it into a rectangle roughly the width of your bread pan.
- Fold the bottom third up and use the heel of your hand to push it down and seal it a bit. Then fold the top third down and push it down to seal it again. Then fold the dough in half again and pinch closed. Watch my video to see these steps. Gently turn under the ends if they look a little untidy then gently place in a lightly oiled bread pan. It will fit well into an 8.5 by 4.5 inch pan or a 9 x 5 inch pan.
- Rub a tiny bit of oil over the surface of the dough to stop sticking, then cover again with the damp dish towel and leave again until the bread dough is nicely domed and about 1 inch above the sides of the pan. It won't take as long this time. In my kitchen about 30 minutes.
- While you are waiting for your loaf to rise preheat your oven to 400° F (200°C).
- Once risen score the top of the loaf with a lame or very sharp knife. A serrated knife works well. If you've got kitchen scissors you can even cut it with those (you can do one long cut all the way down the middle, or several along the width). You can bake it without scoring but accept that the bread will then decide itself where the weak point is and it might split and look a bit unsymetrical and ugly.
- Place in the preheated oven and bake for 40 minutes. Slide out of the pan and cool on a cooling rack. You can check it's ready by tapping the loaf on the bottom with your fist as if you are knocking on a door. It should sound hollow.
- As hard as it is to resist eating it when fresh out of the oven it really is best to leave it to cool completely before cutting. Cutting while still warm affects the crumb and it will stale more quickly because the cut lets the steam out. You can solve this problem by doubling the recipe and making two loaves. One for eating while warm and one for later!
NOTES
💌 SAVE THIS RECIPE!
Watch out for more tasty treats coming your way! Unsubscribe at any time.

Christina says
Love this recipe! So easy and quick.
Can you use 500g whole wheat (or white whole wheat) without adjusting any of the other ingredients?
Irka says
This recipe worked out great for me! Thanks
Tess says
Can i use canola oil instead of olive oil? Would it taste the same?
Melanie McDonald says
Any liquid oil will be fine.
Nakeita says
Can I use oat flour instead of whole wheat?
I'm on a sugar-free diet and i wanted to try this but i also wanna try something new rather than plain all-purpose.
Thanks!
A Virtual Vegan says
Definitely not. Oat flour has no gluten so the recipe won't work. GLuten is necessary for the dough to develop and to provide structure. You'd just end up with a wallpaper paste-like mixture with oat flour.
Bob says
When I mixed the ingredients exactly as listed with my Kitchen Aid mixer, it ended up too dry to make a dough ball. Should I just add a little more water?
A Virtual Vegan says
With bread recipes, the water amount is always just a guide. It can vary so much depending on the brand of flour you use and the humidity where you are. Add an extra few drops at a time until you get a slightly tacky but not wet dough.
Margaret Oget says
Have you tried making this with 500 g of whole wheat flour and 2 T of vital wheat gluten? I would think the vital wheat gluten would also help create a soft loaf.
Alex says
Can this be made in a bread machine?
A Virtual Vegan says
I have never tried it in a bread machine but I don't see why not assuming it fits. Most bread machine pans tend to be pretty small.
Michele says
It’s the best bread recipe I’ve ever made!!! It’s going to be my go to recipe for all time. The crumb is perfect and it rose way over the rim of my large loaf pan to a golden brown crust. During baking I had a pan of water on the bottom of the oven which made the crust perfect and crunchy.
sonja syne says
My bread looks like a brick; it didn’t rise at all. I don’t know what I did wrong...I followed the recipe and the steps.
Melanie McDonald says
This is a really tried and true recipe. Happy to troubleshoot!
Did you weigh the flour? The number one mistake people make is to use cups. You can easily end up with WAY too much.
Did you add lots of flour when kneading?
Was your yeast fresh and active?
Did you knead thoroughly until the dough felt soft and elastic?
Did you proof it long enough?
The usual reasons for heavy bread are using too much flour, not adding enough water, not kneading it thoroughly and under or over proofing.
Bread recipes are always just a guide. The time the proofing takes is always different and if you're not experienced in making bread it is usually a bit of a learning curve. Practice makes perfect. Keep at it and your loaves will get better and better as you become familiar with the process and your intuition around the dough grows.
Hope that helps a bit!
Glenys says
Hello from New Zealand Loaf turned out light and crusty So easy to make Now making one for son and family It won’t last long!!!
virginia says
hi, you say when making your bread to use all purpose flour and in UK its called bread flour, sorry but they are different all purpose flour in UK is plain flour used mainly for pastry,and bread flour is, bread flour , you get better bread from bread flour, than you will from all purpose/plain flour,
ginny, Wales UK
A Virtual Vegan says
I live in North America and I am English so am very familiar with flours there and here. What I state in the recipe is correct. In North America what is labelled "all-purpose flour" is suitable for making bread because it has a high protein content. That's why it's called all-purpose, because we can use it for just about anything. In the UK the flours are very different. You don't have one labelled "all purpose". You have plain, self-raising and bread/strong flour. Your plain flour is not good for breadmaking because it doesn't have a high protein content. It's for cakes and pastries etc and is significantly different to our all-purpose flour, hence the reason I suggest using bread flour if you are in the UK when making my bread recipe. I always give the North American and British alternatives in my recipes because I have extensive knowledge of both. Follow my British alternatives and your recipe will turn out perfectly. Hope that helps clear up any confusion!
Karen Wares says
Just finished making it. Was a perfect sized loaf, and I used a standard bread pan. I did it by hand as I have for decades. Tasty, easy, gotta love that!
Elvira says
I would like to split in halves the dough. Should I use the same time and same temperature ?
A Virtual Vegan says
The same temperature is fine. I've never cooked such a small loaf but I'd guess it will take about 25 minutes? You can tell it's done when it's golden and when you take it out of the pan and knock hard on the bottom with your fist (like you're knocking on a door) it sounds hollow.
You won't be able to put that small of an amount of dough in a standard loaf pan. You'll have to shape it into a boule or batard and bake on a baking tray instead. Or you can make bread rolls with the dough. They take about 18 to 20 minutes.
Kay says
Hello, I have been baking bread for a long time and tried the easy whole wheat bread. Just a question, i left it for at least 15 hours overnight, as it wasn't moving, then kneaded and popped it into the tin, took many hours and I thought it wasn't ready but cooked it and it's delicious. I've never come across this before, it was very cold here yesterday, Will keep making it as the result was worth the wait. Thanks
A Virtual Vegan says
The delay must have been temperature related. In my kitchen it rarely takes more than 2 hours even in Winter.
Or is there a chance your yeast is a bit old? It does start to deteriorate after about 3 months of being open.
The longer it takes though the more flavour there is in the bread so it's never a bad thing if it takes a while. So pleased you enjoyed it!
Pat says
This is very easy to make. I was looking for Vegan, sugar free bread as my husband can't have sugar. Turned out great the first try. Today I am making one loaf in the bread machine and one in the oven. Experimenting to see which turns out best. Thank you!
Jai says
How did the bread machine go?
Claudia says
Turned out great, very easy, but... I found 10 grams of yeast to be quite a bit more than a tablespoon. I think next time I’ll bake it in a 9x5 bread pan or make into a boule and bake in a Dutch oven.
A Virtual Vegan says
Glad you enjoyed it!
10 grams is a tiny bit more than a tablespoon but not much. If you were being absolutely precise one tablespoon is 9.3 grams. I've rounded it up to a tablespoon to make the recipe clearer and easier to read/make for the people who aren't weighing, otherwise it would have to say 1 tablespoon and 0.22 of a teaspoon which would be impossible to measure. It makes no noticeable difference if you use 9.3 grams or 10 grams of yeast when making this recipe so rounding it down a bit like that doesn't matter.
As with all of my baking recipes though, I do advise weighing with a digital scale because it's always more accurate. Every time you spoon up a tablespoon or cup of something it will weigh a slightly different weight.
Vicki says
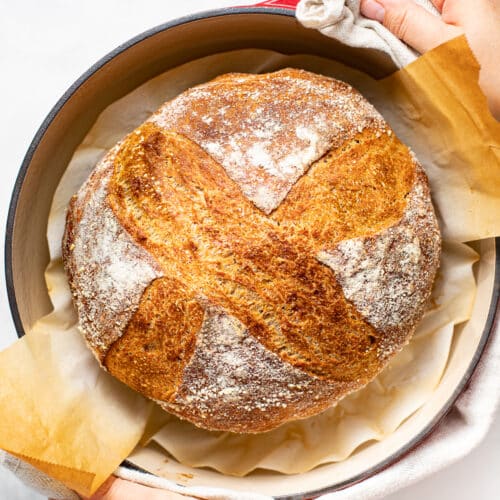
Can you bake this loaf in a Dutch oven?
A Virtual Vegan says
Yes for sure. You will just need to shape it into a boule instead of a loaf shape. Leave it to rise on a piece of parchment paper with a bowl over the top or a damp dish towel, then lower it carefully into the Dutch oven to bake. Preheating the Dutch oven so its piping hot will give you the best oven spring. I'd bake for 20 minutes lid on then take the lid off until it's done. Probably another 20 min.
Julia says
I always find your recipes easy to follow with great final products. This is why I made this, even though I was nervous about the process of kneading and shaping the bread. It came out great! I was pleasantly surprised how crusty it was. There was no need to store this bread ?
A Virtual Vegan says
Ha ha! We have that problem with homemade bread too. It never hangs around for long. I'm really pleased you found the recipe approachable and got a great result Julia!
J.C. says
This was a great recipe. My family ate it in less than a day, they loved it and so did I. Thanks! And I will be making this again!! :)
A Virtual Vegan says
The only problem with homemade bread is you end up eating more of it then you usually would! Glad you all enjoyed it!
Pamela says
I love this recipe! Can the raw dough be frozen for later?
A Virtual Vegan says
Glad you're enjoying it! You can freeze bread dough but I personally don't advise it. It is really hard to get it defrosted and proofed exactly right because it takes so long, and it never seems to bake as well as if you were to bake it right away. Cooked bread freezes so well that it's much easier to just bake it, cool and freeze the finished loaf.
If you do really want to freeze the dough though the best time to freeze is after it has had its first rise and then been knocked back and shaped into a loaf. Freeze the loaf in the loaf pan lined with cling wrap and as soon as the dough is solid you can remove it and transfer to a freezer bag.
To thaw put the frozen dough back in its greased pan, cover with a damp clean dish towel and leave to thaw and rise. The time will vary depending on the temperature of the room but it will take a long while (hours) and you will need to keep an eye on it. As soon as its proofed bake it as per the recipe instructions.
Hope that helps!
Pamela says
Thank you very much! As always, you are clear and easy to understand! Have a wonderfully fun year!
Jennifer says
Loved this recipe and the bread! Will definitely be making again! Thank you!
A Virtual Vegan says
So pleased you enjoyed it Jennifer!