

All the sticky deliciousness of cinnamon rolls but with none (and I really mean none) of the effort! This No Knead Cinnamon Pull-Apart Bread needs about 10 minutes of hands-on time and will totally fit around your schedule. It can be ready in a couple of hours, or you can leave it to rest in the fridge overnight & bake it up in the morning. It makes THE perfect holiday or weekend brunch!

💌 SAVE THIS RECIPE!
Watch out for more tasty treats coming your way! Unsubscribe at any time.
FEATURED COMMENT
"Oh my goodness, these were amazing! I'm normally terrified of anything involving yeast and rising, but these were so easy. I will definitely make again!" - Kristen. ⭐️⭐️⭐️⭐️⭐️ More reviews →
Be prepared to wow your family and friends with this easy and incredibly delicious no-fail No Knead Cinnamon Pull Apart Bread!
It is just incredible, and what makes it even more incredible is that it is such low effort for such high reward. You do not have to knead it at all. Not even once. Just a quick mix, then it does all the hard work itself while you do quite literally nothing.
If you have made my No Knead Focaccia Bread or No Knead Vegan Dinner Rolls, you will know how easy and how good they are. Well, this No Knead Cinnamon Pull Apart Bread is made in a very similar way to both, and is even better because it involves lots of cinnamon and sugar. It's kind of a cinnamon roll and monkey bread hybrid and is absolutely perfect for brunch. Perfect for those of you with a sweet tooth like me!
If you plan to be up early, you can mix it up that morning. All it needs is 2 hours to do its stuff, but that time is all hands off. Or you can mix it up before you go to bed and leave it in the fridge all night. It's such a flexible recipe, which is a major part of its appeal.
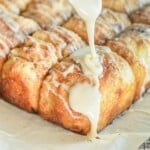
Once baked up to perfection, it's soft, chewy, sticky, and caramelized. Where the balls of dough conjoin, it's super pillowly and soft, the top is caramelized and crusty, and the underneath (my personal favourite part) is chewy, sticky, and caramely.
If you choose to frost it then it gets over-the-top sticky and delicious. Like seriously irresistible.
This recipe is absolutely made for sharing and enjoying with family and friends. Put it down on the table and watch them turn into a pack of hungry wolves!
Mel x

Recipe
No Knead Cinnamon Pull Apart Bread
Author:WATCH HOW TO MAKE IT
Ingredients
For the dough
- 4 cups (500 grams) all purpose flour or bread flour , (in the UK, use strong bread flour)
- 1 tablepsoon instant yeast or quick rise yeast , NOT regular active yeast
- 2 teaspoons fine sea salt
- 1 cup (240 mls) dairy-free milk
- ½ cup (120 mls) cold water , straight from the tap
- ¼ cup (60 mls) maple syrup , real, not pancake syrup!
To assemble
- ½ cup (120 mls) melted dairy-free butter , or aquafaba for oil-free
- 2 tablespoons ground cinnamon
- ½ cup (100 grams cane or white sugar
For the glaze
- 1½ cup (187 grams powdered sugar
- ½ teaspoon vanilla extract
- About 5 to 6 teaspoons dairy-free milk
RECOMMENDED EQUIPMENT
INSTRUCTIONS
- Make the dough: In a large bowl or in a stand mixer add the flour, yeast and salt. Mix them together so they are distributed evenly, then add the milk, water and maple syrup. Mix until all the flour is combined and you have a sticky dough, making sure you get right into the bottom of the bowl. Cover the bowl tightly with a lid or cling wrap.
- If you wish to leave the dough overnight (or all day) before baking, leave it out on the counter for 45 to 60 minutes after mixing (no longer), then move it to the fridge and leave it there for anything between 8 to 10 hours.If you want to make the speedier version, you can put the bowl somewhere warm and leave it for 1½ to 2 hours. If you have a chilly kitchen (under 19°C/66°F), you can leave it for anything between 3½-4½ hours.
- Assemble: Once the resting time has passed, line an 8 x 8 pan (or similar, it doesn't have to be exact) with parchment paper.
- Take your melted butter and make sure it is cool. Don't use it if it's hot.
- Mix the cinnamon and sugar together in a small bowl.
- Dust the top of the dough with a sprinkle of flour and dust your hands too. Pull the dough away from around the edges of the bowl, then pull off chunks of dough about the size of golf balls. Roll them in your hands to neaten them up a bit. Don't worry about being too tidy though.
- Dip each ball into the butter, then roll in the cinnamon sugar before placing in the pan. Repeat until all the dough is gone. Make sure all the balls touch each other. They should be nestled snugly.
- If you have any leftover butter, pour it over the dough in the pan, and spoon any leftover sugar mixture over too. It will be a little sludgy because of the butter getting mixed into it, but that's fine.
- Cover the pan loosely with cling wrap or a damp, clean dish towel and place on or next to yout stovetop.
- Bake: Preheat the oven to 350°F (175°C). Let it preheat for 30 minutes with the dough nearby to benefit from the warmth.
- After that time uncover the pan and place in the oven. Bake for 26 to 30 minutes until puffy and bubbly.
- If you like really soft, moist buns, leave them in the pan to cool, or if you prefer them a little less soft and moist, lift them out onto a cooling rack using the parchment paper as handles. Be careful because there could be some hot, sugary drippage.
For the glaze
- In a small bowl, add the powdered sugar and the vanilla. Gradually add the milk, stirring as you go to work out any lumps. 5 or 6 teaspoons should be plenty to make a thick, drippy glaze.
- While the bread is still warm and just before serving, drizzle over the frosting very generously.
NOTES
💌 SAVE THIS RECIPE!
Watch out for more tasty treats coming your way! Unsubscribe at any time.
Minoo says
How many individual cinnamon rolls I get from this recipe? Thx
Momo says
The cinnamon sugar isn't listed in the comments, is it?
Melanie McDonald says
I'm guessing you mean in the ingredients list, not comments. If so, yes, everything you need to make the recipe is listed including cinnamon and sugar.
Jan says
Hi Melanie! I’ve made this recipe many times, and my family adores it. Can I freeze the pull away bread after it’s already baked?
Melanie McDonald says
I've never tried but I'm pretty sure it will be fine. I think I'd freeze it without the glaze. You can add that once it's defrosted, or pop it in the oven to warm up once it's defrosted then drizzle with the glaze.
So pleased you're enjoying the recipe Jan!
Marie P says
I made this with chickpea flour.Didn't have allpurpose. kneaded it really well. It didn't rise and tasted bad. Was it my yeast?
M says
Absolutely glorious cinnamon bread!! I make this every month or every 2 months since it’s so delicious. It’s even good cold the next day. I’ve put the cinnamon sugar into the melted butter on accident, but it didn’t change the outcome- this just skips a step. Also, for faster proofing (especially in winter) I let the dough sit in the oven with only the oven light on. I’m leaving this comment as a thanks to Melanie before I make it!
A Virtual Vegan says
Thanks so much! I'm really pleased you're enjoying it!
M says
Of course! <3 So, update on the last batch I made-- I didn't have maple syrup, so I replaced it with almond milk and added some sugar. I baked for 26 minutes, and they came out dry, though the pieces in the middle were moist. TLDR-- if you can help it, don't skip the maple syrup!!!
Martha says
Hi, I was looking for the video for the No Knead Cinnamon Pull apart bread but I could not find it. Can you send it to me? See below my email address.
R says
Can I use baking soda and ACV in stead of yeast?
Melanie McDonald says
No.
Myra says
350f/175c fan assisted or regular? Making them now!
A Virtual Vegan says
Not fan assisted. Just regular.
Samantha says
Any suggestions on how to do this recipe with sourdough starter instead of dry yeast?
Nina says
Loved this dessert! I decided to try 50% earth balance and 50% aquafaba. It tasted amazing. Im going to try all aquafaba next time to see the difference. Thank you!
A Virtual Vegan says
I'm glad you enjoyed it Nina!
Kristen says
Oh my goodness, these were amazing! I’m normally terrified of anything involving yeast and rising, but these were so easy. I will definitely make again! Now that I’ve made two successful recipes in the last two days, I look forward to exploring other recipes on the site.
A Virtual Vegan says
Thank you so much Kristen! I'm really pleased you it. You should give my No Knead Focaccia Bread recipe a try too. It's even easier! Here it is: https://avirtualvegan.com/miracle-no-knead-focaccia-with-rosemary-sea-salt/
Sandra says
I only have easy bake yeast..... Will this be OK?
A Virtual Vegan says
Easy bake yeast is the same as instant or quick yeast so yes it will be fine!
Peggie says
This recipe looks delish! Can it be made gluten free?? If so, how?
A Virtual Vegan says
Sorry, I've never tested this recipe gluten-free.
Shawna says
This cinnamon bread recipe is amazing. I would have never thought about using aquafaba instead of butter/oil to dip the bread in before rolling in cinnamon and sugar. Thank you for creating a wonderful recipe that’s vegan and oil free. It was a big hit with my friends and I will make it again for Christmas.
A Virtual Vegan says
I'm really pleased you all enjoyed it Shawna!
Beverly says
anyone tried butter, brown sugar & nuts in the bottom of the pan to make these caramelly? Do you think it would work?
A Virtual Vegan says
I haven't tried it but I'm sure it would work.