
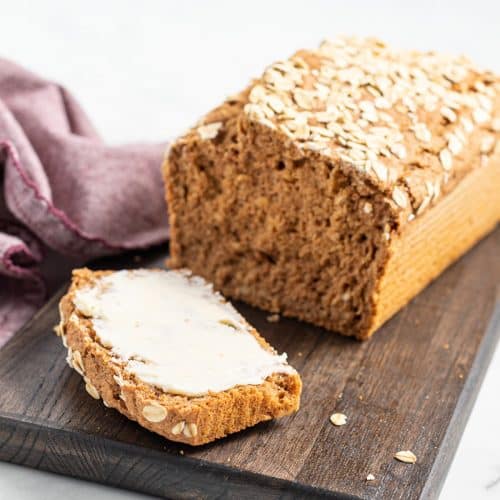
Simple, easy, artisan-style vegan sourdough bread made with just three ingredients: flour, salt and water. Full of flavour with a crispy, crusty, crackly crust and soft, tender crumb. This is a low-hydration sourdough loaf, so it is perfect for beginner sourdough bakers. I've even included some printable sourdough baking schedules, so you can see exactly how to make it work around your day!
FEATURED COMMENT:
"Thank you so much for posting this amazingly detailed, never-fail recipe! I am late to the party when it comes to sourdough, but thanks to you, I am obsessed! Getting a scale was a game-changer. I have made this at least two dozen times, and my family now gets upset when they see "Bread Pitt" in the fridge instead of on the countertop! Thank you, thank you, thank you!!!!!!" - Donna ⭐️⭐️⭐️⭐️⭐️ More reviews →

💌 SAVE THIS RECIPE!
Watch out for more tasty treats coming your way! Unsubscribe at any time.
If you're not a carb-lover, then exit the building because we are going to be making (and eating) crispy, crusty, deeply golden, flavour-packed, completely irresistible, and easy to make naturally vegan sourdough bread. And we are going to make it with our very own homemade sourdough starter!
No commercial yeast is required for this recipe, so if you haven't brewed up your own little jar of sourdough starter bread-making magic, then go check out my easy no-discard sourdough starter recipe now. And if you've previously been intimidated by sourdough starters and all they involve, don't worry, because my recipe is really easy and involves no discarding and also no daily feedings once it's established.
Like my starter recipe, this sourdough bread recipe is stripped down and simplified as much as possible, making it perfect for beginner sourdough bakers.
The process is long, and I'm not going to lie, it is a learning curve. It takes a lot of practice, but my aim is to make the process as easy as I possibly can, because I believe that everybody deserves to be able to tear into and enjoy an unbelievably delicious, freshly baked artisan-style loaf of sourdough bread!
I'm even including printable sourdough schedules as examples for how you can make your baking fit easily around your day.
Mel x
This post is long, detailed, and contains a lot of helpful information. I recommend you read it in its entirety before making a start, particularly if you're a beginner baker, but when you come back to it again, jump to where you want to be via the table of contents below:
Printable Sourdough Schedules
Enter your email in the form below if you want to get my free sourdough schedule printouts. They aren't necessary for this recipe, but making sourdough is a long process, and if you are a beginner, they will really help you learn how to schedule the process around your day.
Ingredient Notes
To make this easy sourdough bread, you will need:
- Flour - Preferably bread flour (strong flour in the UK), although in North America (Canada in particular), all-purpose flour is generally ok too. To be safe, check the protein content on the nutritional information chart on the side of the bag. It needs to be at least 12% but ideally 13 to 14%.
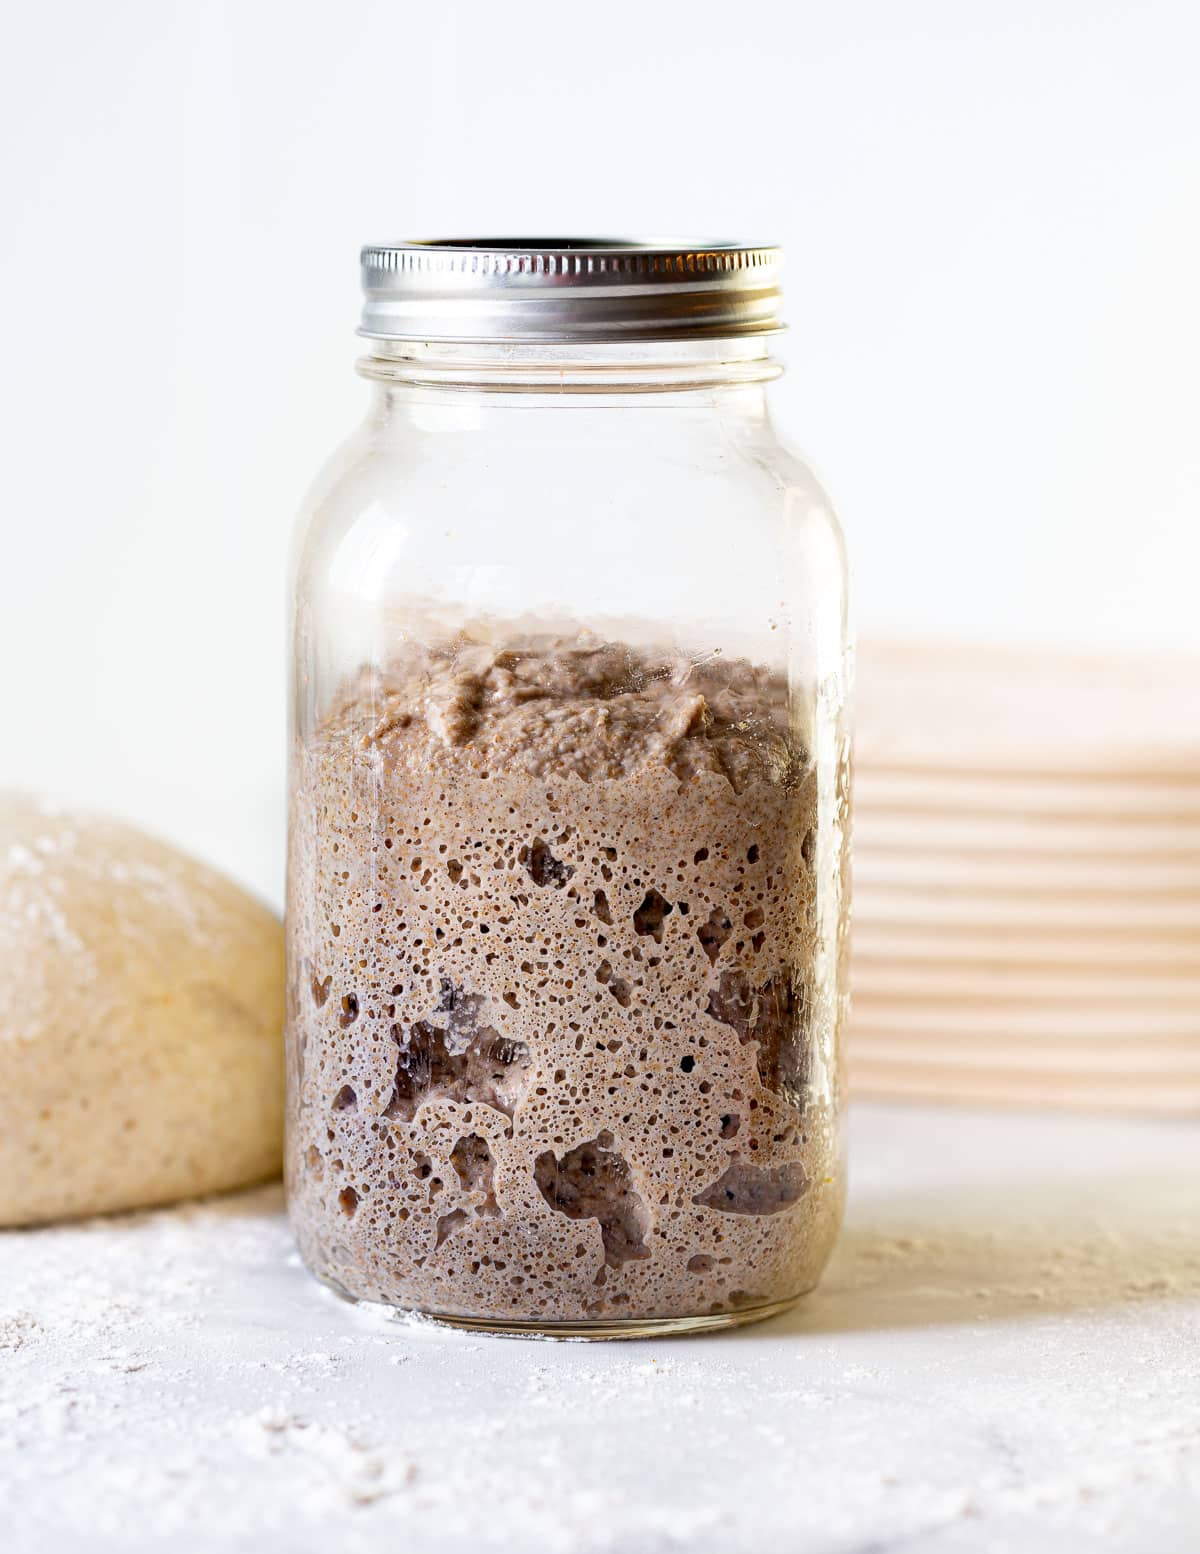
- Sourdough starter - A healthy, active, and thriving starter at peak activity. In case you missed it, you can find my easy no-discard sourdough starter recipe here. This bread recipe assumes your starter is at 100% hydration (i.e fed an equal weight of flour and water).
- Salt - Not table salt! The salt used should be good-quality sea salt or kosher salt that does not contain additives, especially not iodine or anti-caking agents. These additives can interfere with the sourdough starter's activity and ability to ferment the bread.
- Water - Tap water is often ok to use, although in some areas it might be necessary to use filtered water or spring water. Assuming you have a successful, thriving sourdough starter, use the same water you use to feed your starter to make your bread dough.
Recommended Sourdough Equipment
Learning to make sourdough is an investment and can quickly become overwhelming. Here is the equipment I recommend you invest in and why:
- Digital kitchen scale - Most important! Please don't use cups to measure when making bread or starter. Baking is a science, and cup measurements are not accurate enough. In my sourdough recipe, I will be asking you to weigh all of your ingredients, including the water. This scale is really cheap and works well. Perfect if it's your first and you don't want to spend a lot. If you're looking for a better quality scale that's great for breadmaking and don't mind spending a little more, the Oxo Good Grips 11lb Stainless Steel Scale with pull-out display is excellent.
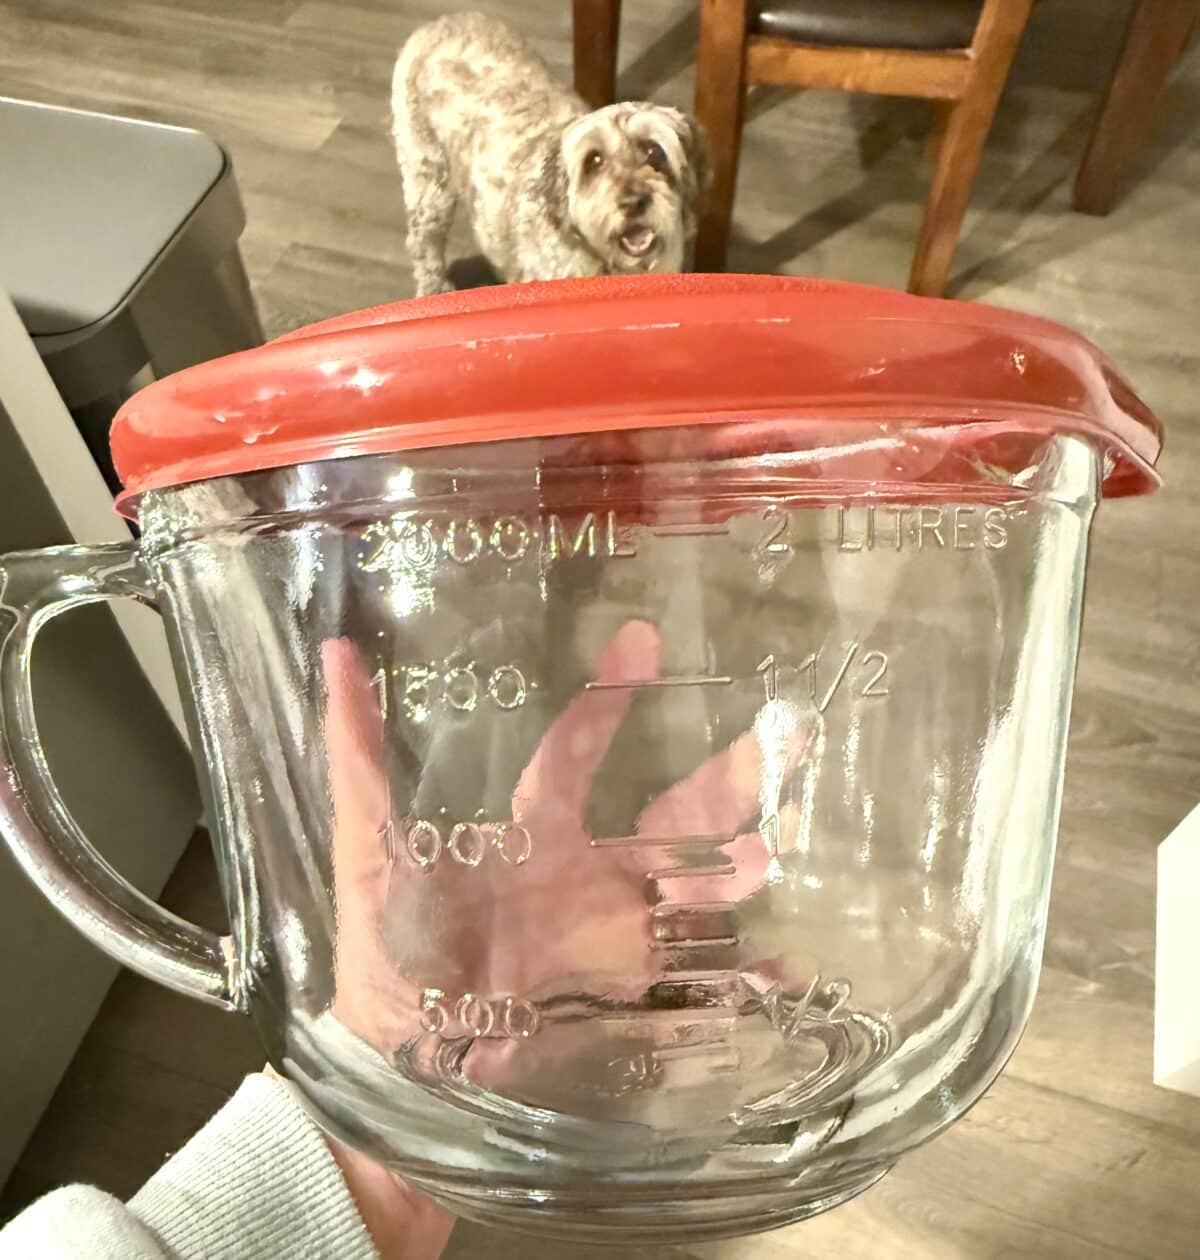
- Mixing bowl/container - Any large mixing bowl will do, but if you want to make your life WAY easier and have a much better chance of success from the get-go, a clear, straight-sided container or a bowl/container with measurements marked on it will be really useful for calculating when bulk fermentation is done. Getting bulk fermentation right is crucial for good results and the hardest part of making sourdough. A mixing bowl with sloping sides makes it impossible to judge how much the dough has increased in volume, so it is not the best choice if you're a beginner.
I absolutely love these 2-litre/quart Anchor Hocking batter bowls. They are reasonably priced, big enough for one loaf of sourdough, have the measurements clearly marked, have a lid to stop your dough drying out, and they are useful for lots of other things in the kitchen too.
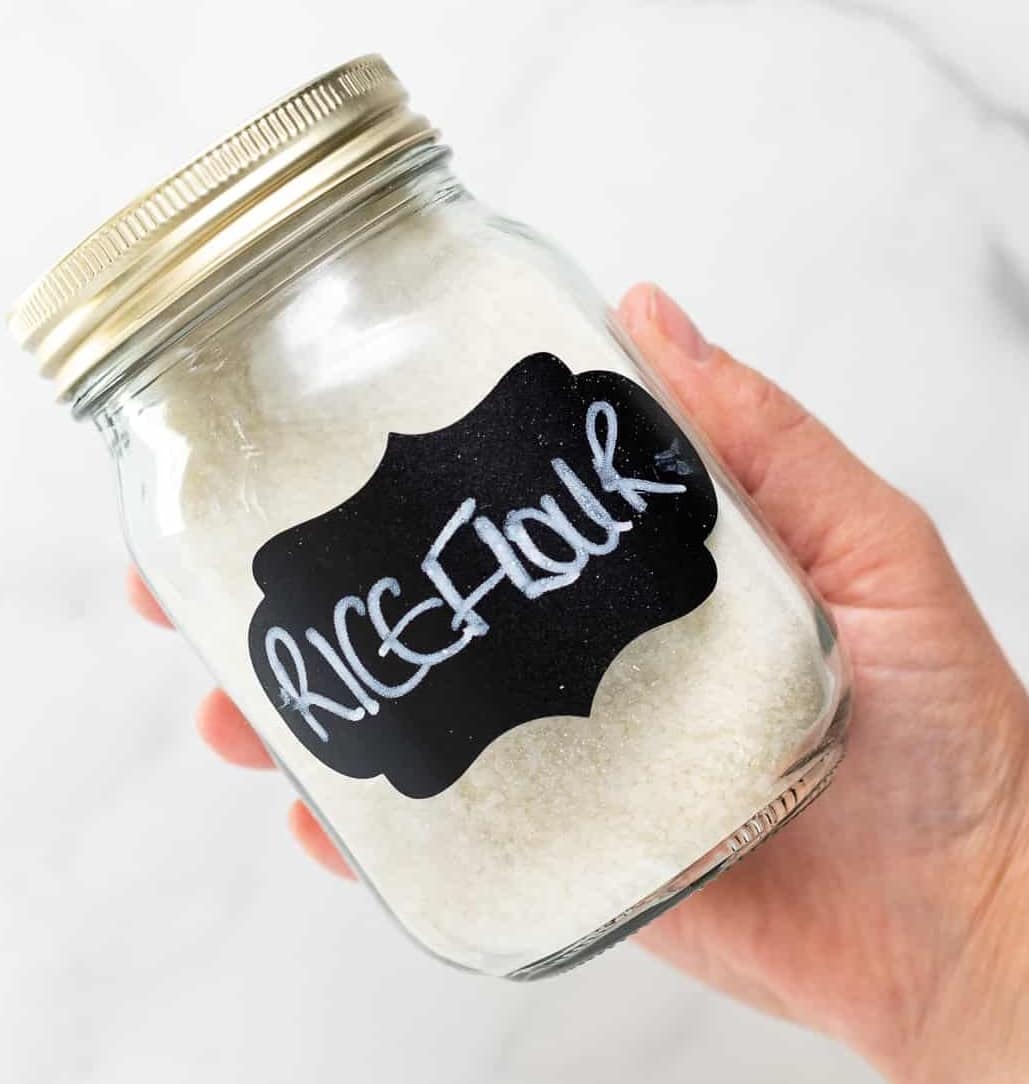
- Rice flour - Preferably rice flour but any other fine, gluten-free, gritty, and not very absorbent flour like cornmeal or polenta, will do. This isn't for actually making the bread dough. It's to ensure your dough doesn't stick to the banneton or other container/cloth you do the final rise in. Wheat flour does not work well because, over time, it absorbs the moisture from the dough, making things sticky. Rice flour is grainy and does not absorb moisture, so it creates a non-stick barrier. Please don't think it will be ok and chance making a loaf without it. It is absolutely heartbreaking to put your time and effort into making a lovely loaf of sourdough bread, only to find the shaped loaf is stuck in the banneton just as you are about to bake it.
- Razor blade, lame, or a very sharp knife - For scoring your bread before you bake it. As long as it is super, super sharp, it will work. Sharp kitchen scissors will work in a snip (Sorry - couldn't resist the pun!), but you won't get a nice, clean cut, so your loaf won't be as visually appealing. Scoring your bread before baking is really important. I'll go into why a bit later.
- Water spray bottle - For spraying your surface, your tools and the dough. If you don't have one, have a small bowl of water next to you to dip your hands and tools in as you work.
- Dough/bench scraper - Not absolutely essential, but they are cheap and so handy, not just for bread-making, but also when making pastry or any other dough. A dough scraper allows you to shape dough without getting sticky hands, divide it easily when making multiple loaves/rolls, and also makes cleaning up your counter a breeze because you can scrape flour and dough remnants off quickly and easily. I have this Oxo Good Grips Stainless Steel Bench Scraper/Dough Cutter.
- Bowl scraper - A bowl scraper is really handy for scraping every last bit of dough (or cake batter) out of your bowl and for cleaning up the sides of the bowl during stretch and folds. Not essential by any means, but super cheap and really nice to have.
- Dutch Oven - A 5 or 6-quart Dutch oven is perfect. I really like the Lodge 5-quart Double Dutch Oven because it's really reasonably priced, and you can use it upside down. Place the loaf on the lid and use the base like a cloche over the top. It saves you from having to lower your delicate bread into a deep, screaming-hot pot. The lid also doubles as a skillet. If you're in this for the long haul, though, I absolutely LOVE my Brod & Taylor steel and baking shell. I used Dutch ovens or pizza stones for decades, but treated myself to this power duo a little while ago. They work really well and, unlike Dutch ovens, they are really light!
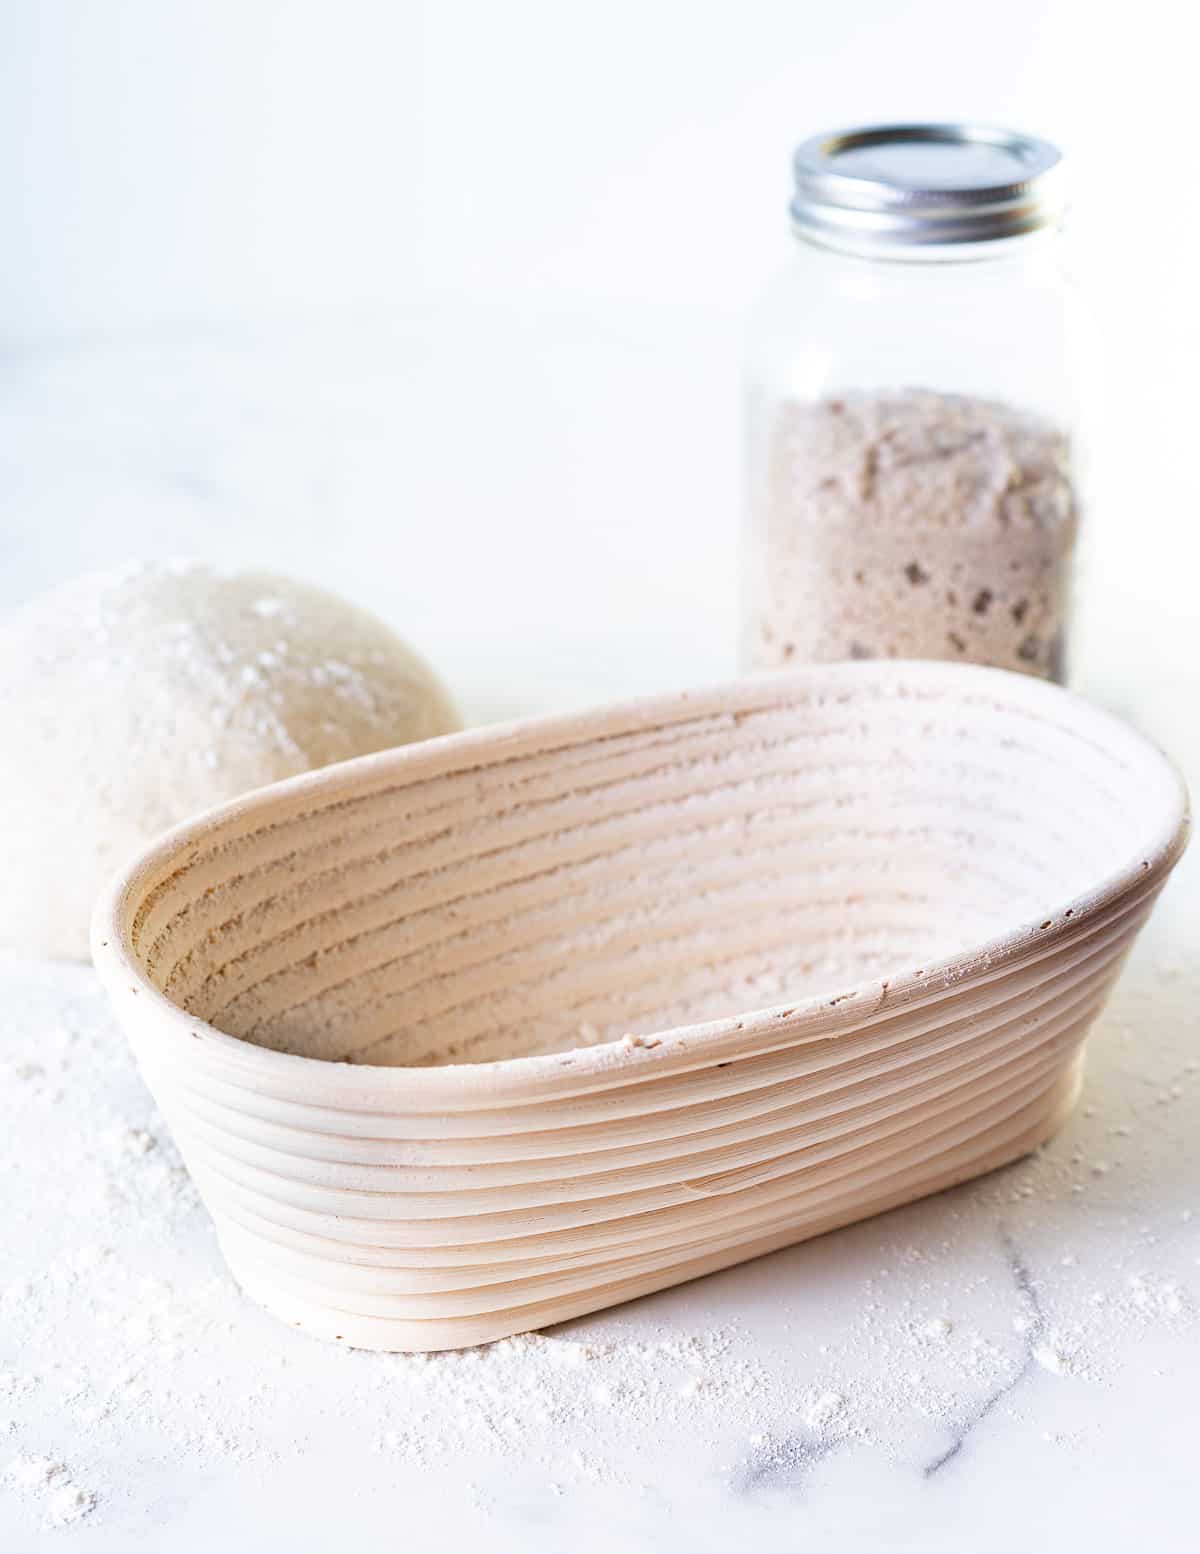
- A banneton (proofing basket) or a medium mixing bowl/colander and a clean, lint-free dish towel - Sourdough needs support once it's been shaped and is having its final rise. To provide this support, you need a banneton (like the one in my picture below), or you can use a bowl or colander lined with a VERY well rice-flour-dusted, clean, lint-free dish towel. For this recipe, I recommend a banneton that holds about 900g of dough - An 8-inch round banneton or a 9 to 10-inch oval one. I recommend using a wicker, rattan, or wood pulp banneton. I do not recommend silicone bannetons. My preference these days is wood pulp. I feel like they give superior results. They do tend to be a little pricier, though.
- Digital thermometer - One with a probe that you can stick into the bread to check the internal temperature. This makes it much easier to tell when your bread is fully cooked. I have a ThermoPro Waterproof Digital Instant Read Thermometer. It was less than $20 and works really well.
- Parchment paper - But don't buy really cheap parchment paper. Make sure it is thick and good-quality, or it may stick to the bottom of your bread. I use Kirkland Signature Parchment Paper. Do not use wax paper instead of parchment paper, or you'll be in for a disaster!
Let's Make Easy Sourdough Bread!
I have simplified this easy sourdough bread recipe to make it as straightforward as I can. Don't be alarmed by how long it takes. Although it's simplified, this is sourdough. It cannot be rushed. Fermentation takes time. It is nearly all hands-off time, though, and it is really easy to work it around your schedule. For examples of how to fit your sourdough baking into your day, print my free sourdough schedules.
Here you can see each step with photos/videos as a visual guide:
Make the dough - Put the sourdough starter and the water into a bowl and whisk them up to make a milky-looking, bubbly liquid.

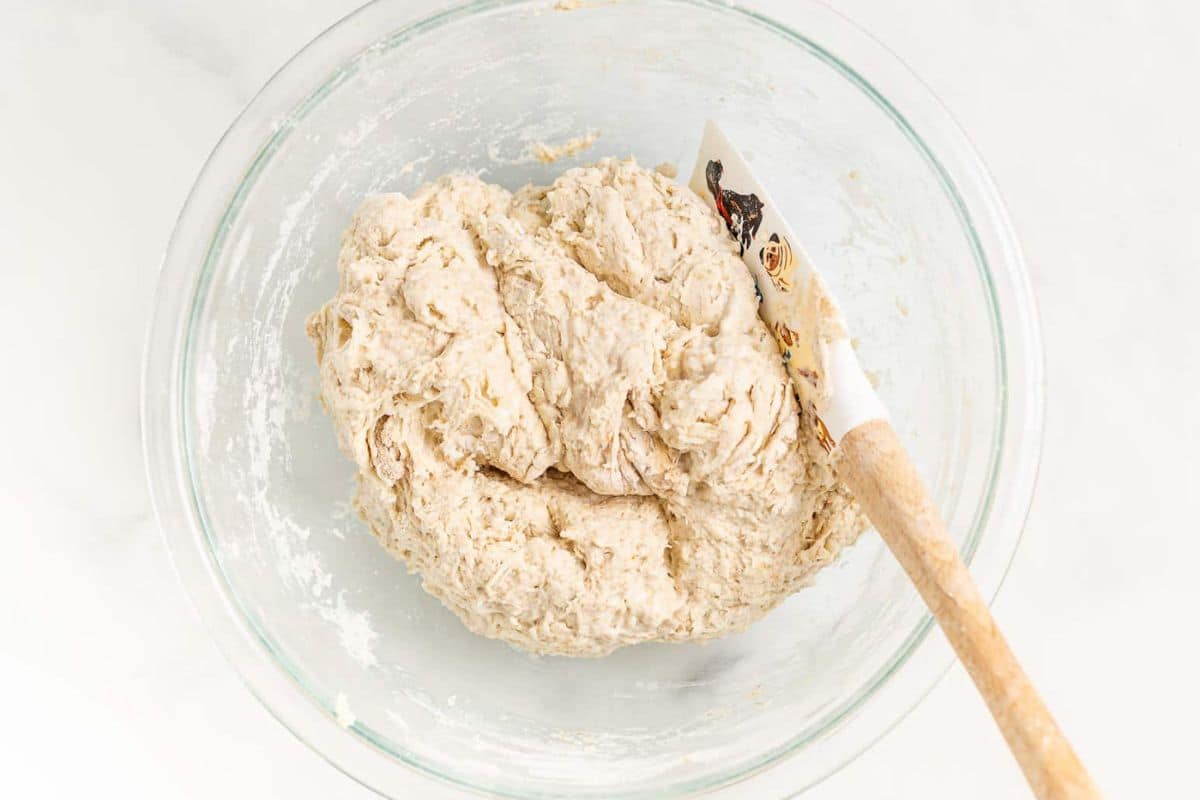
Add the flour and salt, and mix really well until everything is combined and there is no dry flour. Cover your shaggy-looking dough and leave it to rest for 1 hour. I recommend using a wet, clean dish towel, a dinner plate that fits on the top of your bowl well, or a lined bowl cover. This is important because it stops the top of your dough from drying out.
Perform 3 to 4 sets of stretch and folds approximately one hour apart. This (and time) is what strengthens your dough.
For each set of stretch and folds, first wet your hands to make them non-stick. Spray them with a water spray or have a small bowl of water beside you to dip your hands as needed.
With your wet hands, pick up one side of your dough, stretch it up and out, then fold it over the top of the dough ball. Rotate the bowl and do this all the way around as many times as you need to before the dough feels too tight to do anymore. Then cover the bowl, and rest (you and the dough!) until the next set. You will find that with each set of stretch and folds, the dough gets a little harder to pull, and that's because it is getting stronger. 3 to 4 sets should be plenty.
Here is a quick demo of me doing some stretch and folds. I usually use 2 hands, but my bowl was trying to fly off the counter, so I could only use one here:
The windowpane test - By now, your dough should feel strong, taut, and stay in a tightish ball rather than splodging out to the sides. To make sure it's strong enough to stop stretch and folds, perform the windowpane test. Pull a small section of dough gently up and out, and carefully stretch it as thin as you can with your fingertips. If you can stretch it thin enough to clearly see light through it (like a windowpane) without it tearing, then you're dough is strong enough. If it is still not holding its shape and doesn't pass the windowpane test, give it one more round of stretch and folds.
Here's a quick demo. See how it can be stretched so thin you can see the light through it like a window:
Bulk ferment - Cover your now strong ball of dough with a bowl cover, wet dish towel, or a lid, and leave on the kitchen counter for the remainder of the bulk fermentation. The time the bulk fermentation takes depends on your personal environment and the strength of your starter. You will need to be flexible and use your intuition. It will be very different for everyone. Mine takes about 7 hours in my 20 to 21°C kitchen.
The end of bulk ferment - Unlike yeast bread, you don't want your dough to double. I recommend letting it increase in volume by about 70 to 75% at first, then you can adjust that percentage up or down as necessary to dial it in for future loaves. This is because it takes your dough a few hours to cool down once it's shaped and put in the fridge for its cold retard. If you let it double in volume before shaping, it will overproof in the fridge.
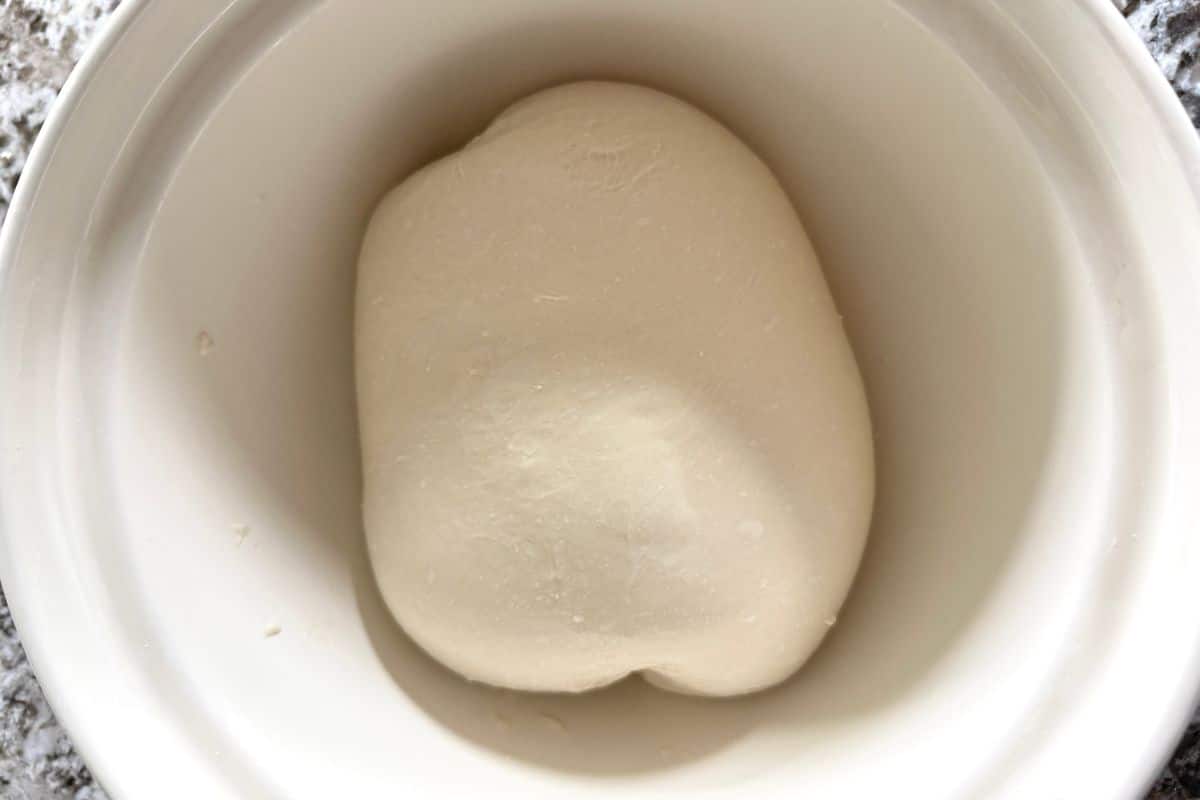
When bulk ferment is finished, the dough should look and feel like it has life in it. Instead of being a dense mass, it should be slightly jiggly if you wiggle the bowl, domed and aerated, with bubbles throughout (that's why a clear container is useful until you get more experienced). When turned out onto the counter, it should feel almost like a giant fluffy marshmallow. The top of the dough should look shiny (almost like satin), and it should not be sticky. It should pull cleanly away from the sides of the container, like this:
For further reference, here is a quick video of another batch of bulk fermented dough from the top/side. Notice how it's nicely domed and has bubbles going all the way through it. Its volume has also increased 70%:
Preshape - Once the bulk fermentation is finished, it's time to gently pre-shape the dough. For the pre-shape, you are simply and very gently getting your dough into a round ball shape, then letting the gluten relax again so that when you give it the final shape, it's easier to get a good, smooth, taut shape. I don't recommend flouring your surface for this. Instead, mist the counter and your dough scraper with a fine spray of water. Gently turn the dough out without bursting any bubbles or handling it too much, then use your bench scraper or hands in a push and pull motion to form it into a ball. Then let it rest for 20 to 30 minutes.
Final shape - The easiest way to shape is with a caddy clasp. Turn your preshaped dough ball upside down (this is where a bench scraper is really handy) so that the smooth and dry top is now on the bottom, and hold it in your hands. Gently fold it in half like a book. If using an oval banneton, that's it. Place it gently seam side up in the banneton. If you are using a round banneton, fold it in half like a book, rest it gently on the counter so you can pinch the seam closed, then pick it up again and fold it the other way before placing it in the banneton.
Here's a video of me doing the caddy clasp for a boule:
Create some more tension, then cover and refrigerate. Now you can either pull the seam together a bit tighter by pulling gently up from the sides and pinching it shut, or you can stitch it. I like to stitch mine (see below). Having good surface tension helps with ovenspring. Once this is done, sprinkle with rice flour, and cover with a banneton cover or pop the whole thing inside a plastic bag and tie a knot in it. Place in the fridge for anything between 10 to 24 hours. This gives the dough time to finish fermenting, adds more flavour, gives you a better crust, and makes it easier to handle and score because the dough firms up when cool.
Here is a video of me stitching my dough:
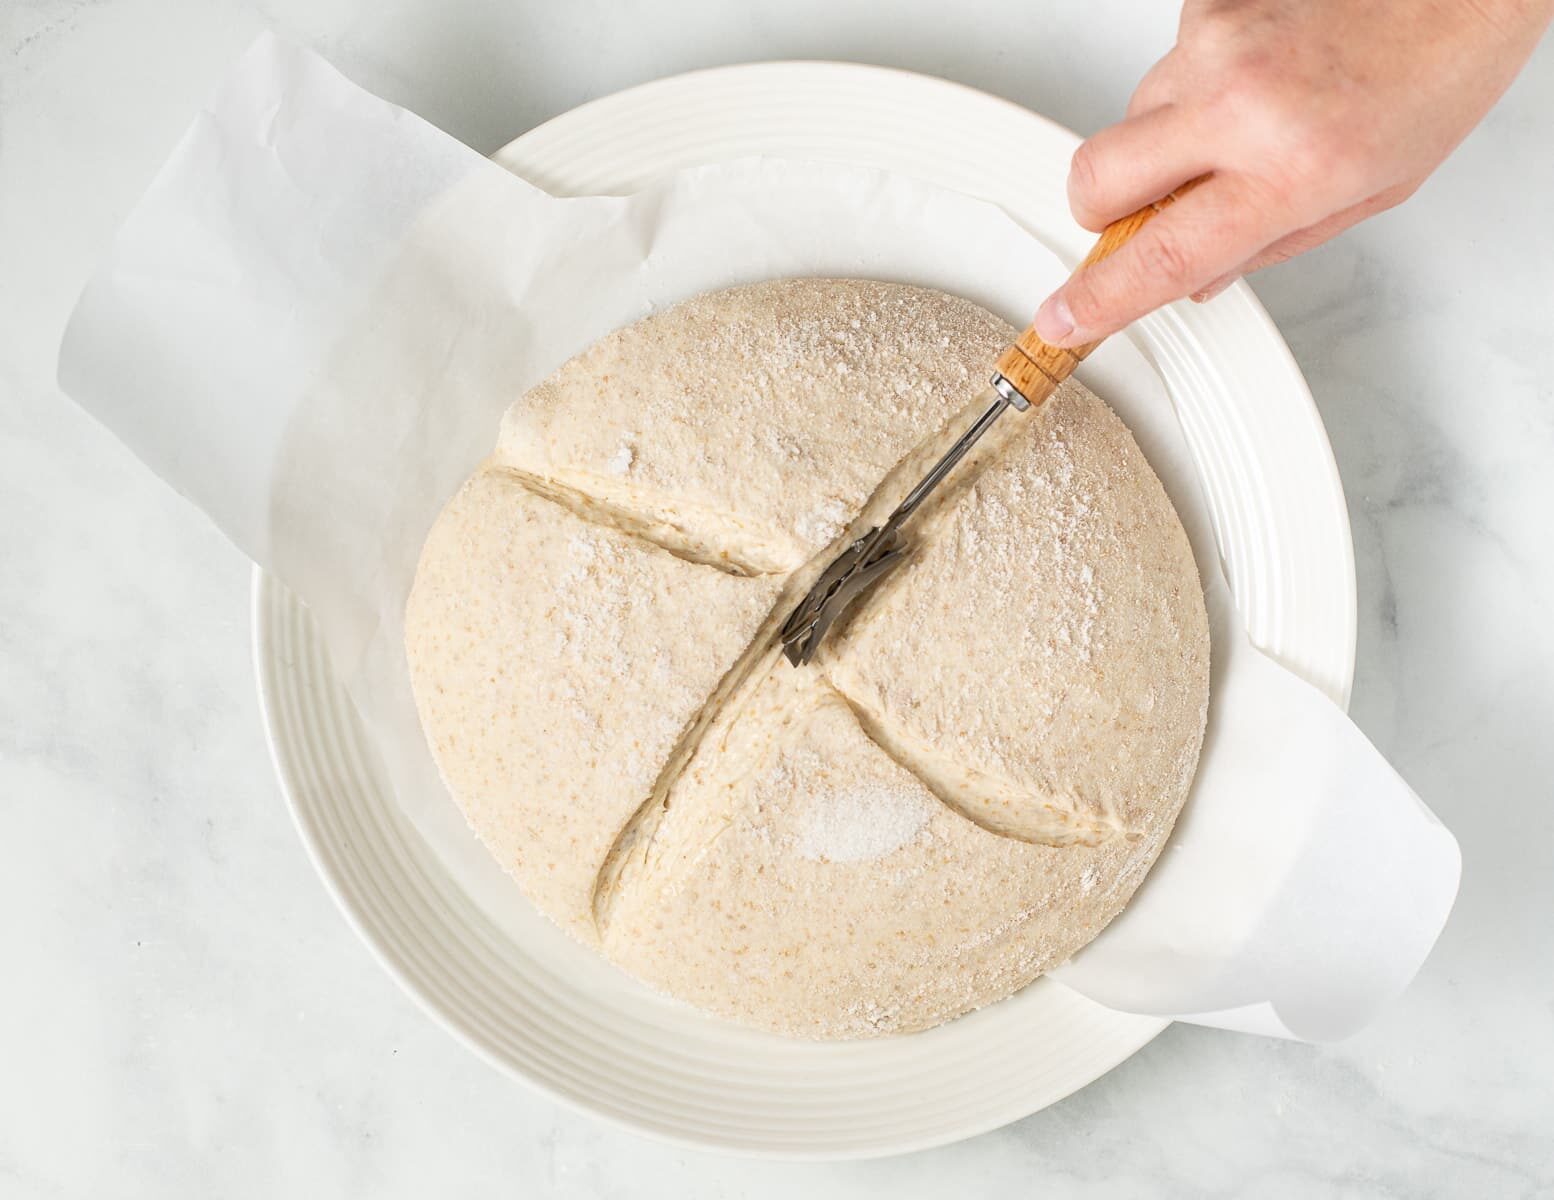
Bake - Preheat your oven with your Dutch oven inside. When the oven is at temperature, cut some parchment paper (a square or rectangle a bit bigger than your banneton). Flip the banneton over and onto the parchment paper to remove the uncooked loaf, then use a bread lame, razor blade, or very sharp knife to score your dough. Be deliberate and quick.
Carefully drop your loaf into the hot Dutch oven using the parchment paper as handles. Immediately put the lid on and return to the oven. Bake for 20 minutes with the lid on, then remove the lid and bake for another 20 minutes until golden and crusty. Remove and cool completely on a wire rack.
Make Your Own Rice Flour
Sure, you can buy rice flour, but if you have some rice and a high-speed blender, then you can easily make your own. Simply add the uncooked rice to your blender jar and blend on high until you have a fine flour-like consistency. It takes about 3 minutes in my Blendtec. Then transfer to an airtight container for storage.
Storing Homemade Sourdough
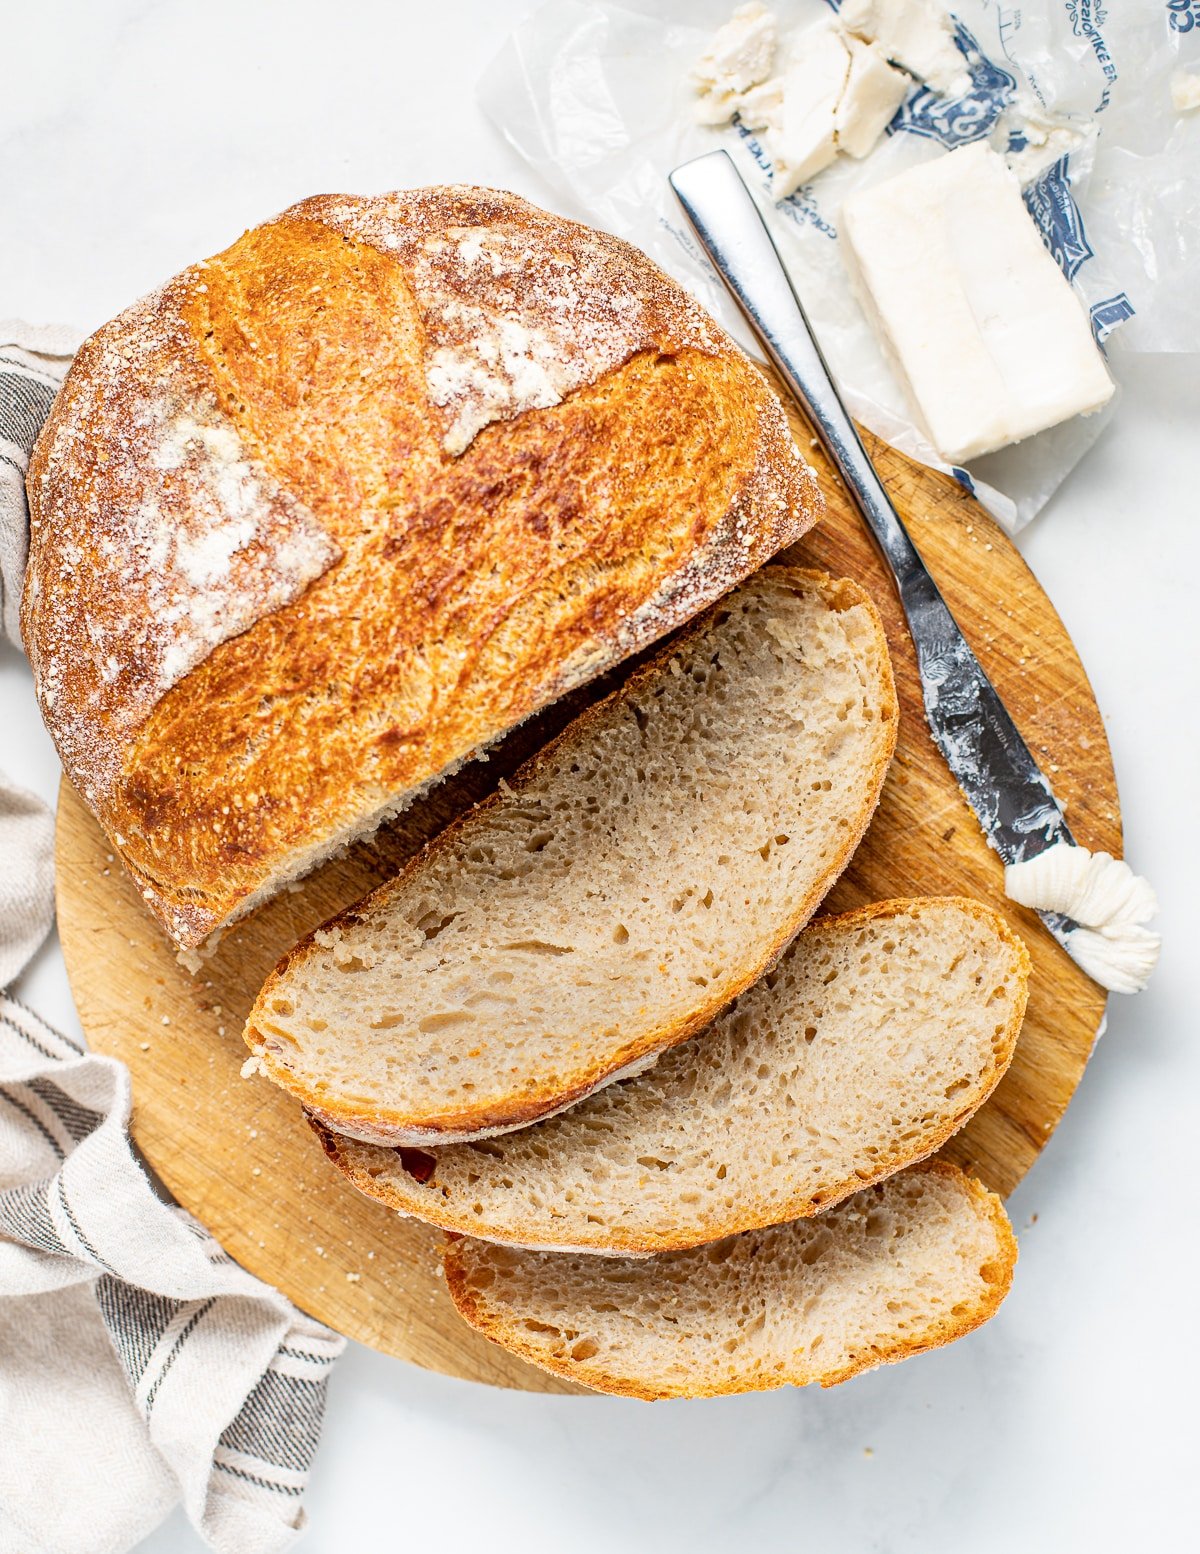
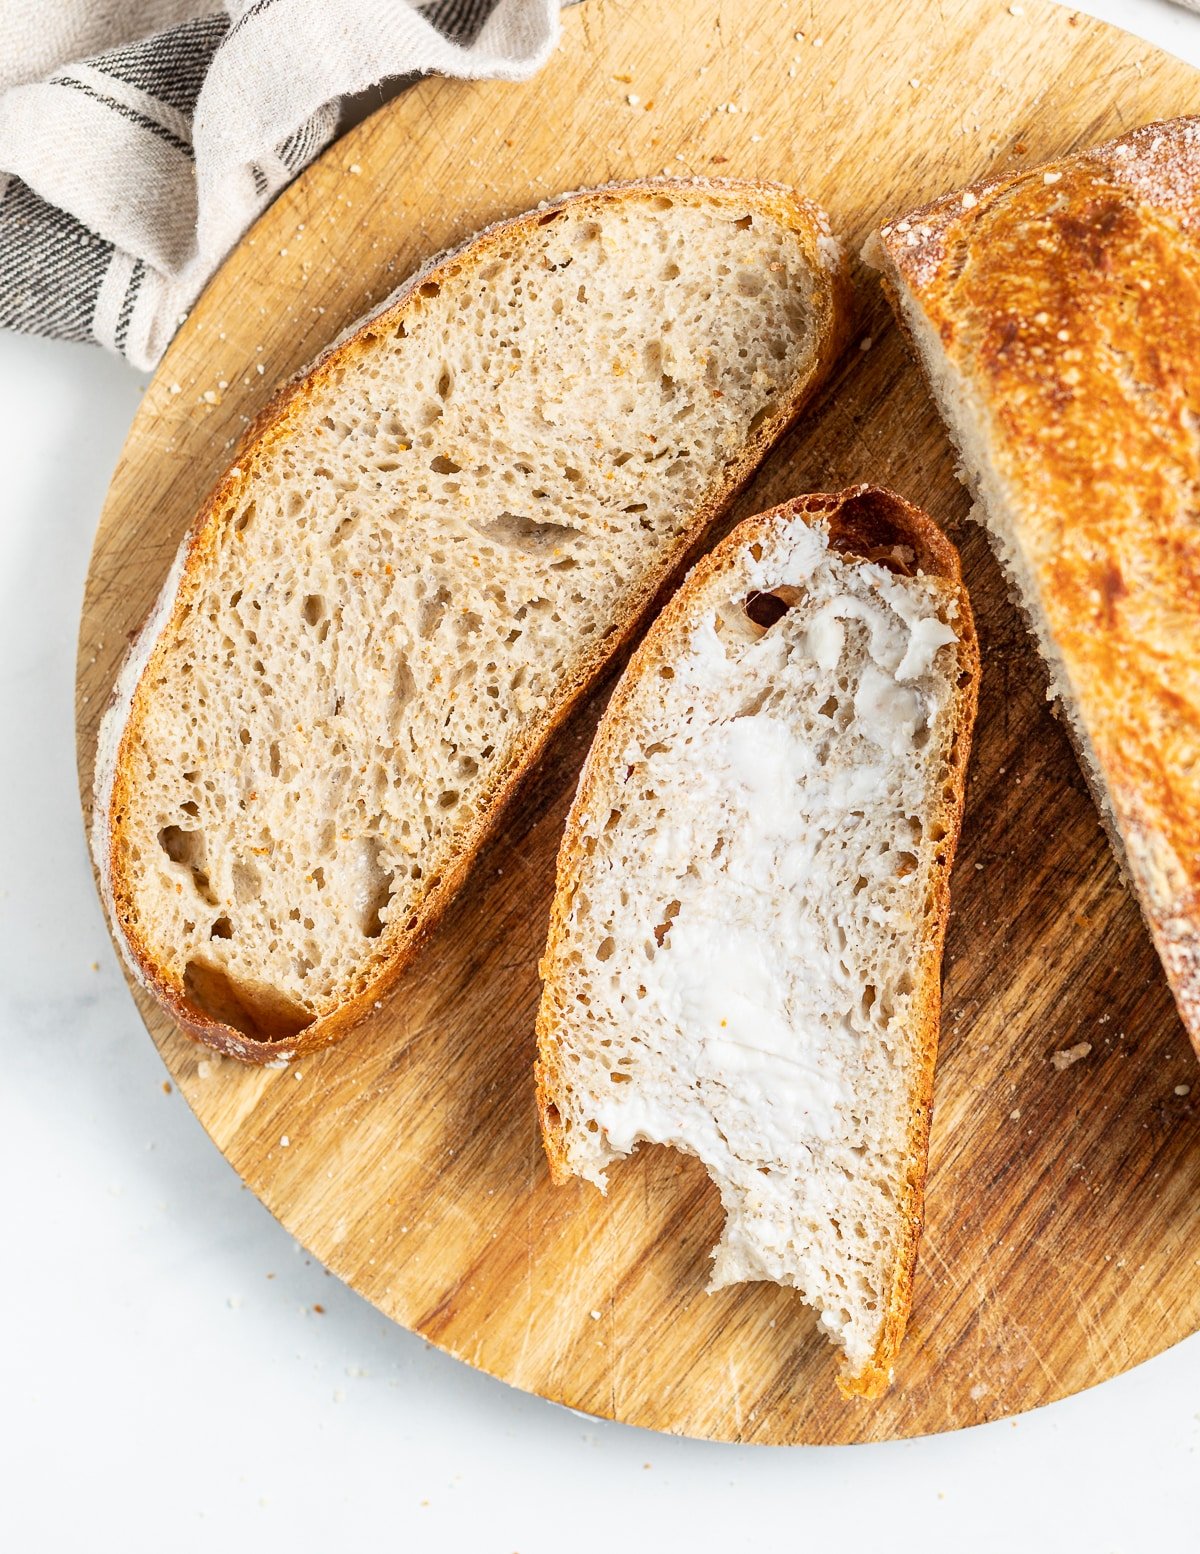
The most important thing to remember with regard to storing your bread is to let it cool completely before cutting. I know that's hard when we're talking about a fresh-from-the-oven, warm loaf of bread, but if you want it to keep well and slice easily, it's important.
When uncut, I like to leave my bread sitting on a wooden cutting board draped with a clean tea towel. This preserves the crispy, crackly crust. Or you can freeze it for up to 3 months.
Once cut, it's best to either store it cut side down on a wooden cutting board if you will be finishing it quite quickly, use a covered cake stand, or pop it in a plastic bag or reusable bread bag and keep it out at room temperature. Never put it in the fridge.
I've tried many reusable bags, and they aren't all created equal. In some the bread dries out terribly, or it sweats. My favourite at the moment is Mod Kitchen Fresh Bread Storage Bags. They are made from recycled water bottles and keep my bread nice and soft for days. Unfortunately, they are no longer easy to buy in Canada, but if you're in the U.S. you should be good!
Let's Get Real About Baking Sourdough
Before you go off to bake old-fashioned, artisan-style, sourdough bread like a boss, I do want to get real for a moment and tell you what most other sourdough bread recipes out there don't.
Making sourdough bread is very much a learning process. It's not as simple as following the recipe exactly and pulling a great loaf of bread out of the oven, and I don't want you to go into it with unreal expectations.
I'll be honest. Chances are, your first loaf won't be fantastic. Baking sourdough, even this simplified and easy sourdough bread recipe, is not easy, and the sourdough process is very different for everyone because it relies on so many factors, including handling, temperature, the strength of your sourdough starter, and environment. Much more so than breads made with commercial yeast.
So, although I can guide you and give you a rough idea of what to expect and how long each stage will take, it is impossible to be exact. That's where intuition, experience and judgement come in. And you only get that by practicing.
I'm not telling you this to put you off, but rather so you know that with sourdough baking, you really need to be open to learning and to be in tune with your dough and the bread-baking process. You also need to be patient and persistent. Failures will happen, and with them comes even more satisfaction when you nail it! And that's why sourdough bread baking is one of the most rewarding things you can do in the kitchen.
Sourdough FAQs
Most home ovens don't do the best job of baking artisan-style bread. Steam escapes from them too easily, and heat escapes through the oven door when you open it to put your bread in. By using a Dutch oven, you create the perfect environment for baking sourdough. The temperature is kept consistent because the Dutch oven is scorching hot and holds the heat well. It's preheated before the bread goes in, and when you open the oven door to put the bread into the oven, the Dutch oven retains the heat, so there is no significant temperature drop. A Dutch oven also has a heavy cast-iron lid that traps the steam escaping from the baking loaf. This steam stops a crust from developing so quickly, which improves oven spring (swelling and expansion of the loaf). Steam also helps develop a really crispy, crackly crust. It's the easiest and most foolproof way to bake sourdough in a regular home oven.
A proofing basket (banneton) is the perfect vessel to support your shaped bread dough during its cold retard. It's porous material (cane, wood pulp, or wicker), wicks away moisture, helping to create a "skin" on the dough. That helps to support your loaf, enables it to keep its shape, and also helps make scoring easier.
I recommend using a Dutch oven if you can, because it's the easiest way to create the perfect environment for your bread. I realize not everyone has one, though and it's perfectly possible to bake a good loaf without one.
Here are some ideas:
Use a pizza/baking stone - These hold onto the heat and work really well. Preheat it in the oven so it is scorching hot when you add the bread. To get the bread on there, you can either turn it out of the proofing basket onto parchment paper and slide it onto the stone while still on the paper, or use a small baking tray. Turn it upside down and dust the back of it really well with rice flour, cornmeal, semolina or some coarse wholewheat flour. Turn your loaf out of the proofing basket onto the floured surface of the baking tray. Give it a bit of a slide around to make sure it moves around freely. Score it, then use the tray like a baker's peel to slide the loaf onto the scorching pizza stone. It sounds tricky but it's actually not too difficult. You will also need to introduce some steam to the oven, so have a roasting pan on the shelf underneath the pizza stone. As soon as the loaf has hit the pizza stone, pour some boiling water from a kettle into the roasting pan and shut the door quickly. After 20 minutes of baking, you can open the door and remove the pan of water.
Use a pizza/baking stone with a bowl over the top - Same as above, but as soon as the bread is on the stone, cover it with an oven-safe bowl or pan of some kind. By doing this, you don't need to add a pan of water.
Use a regular baking tray and a bowl or pan - Turn the loaf out onto a regular baking tray and cover it with a large stainless steel mixing bowl, saucepan or casserole dish to trap the steam. Anything that's oven-safe and large enough will do.
A clay pot, Pyrex dish, casserole dish, a turkey roaster, or soup pot - Anything that's oven safe and has a lid and that the loaf will easily fit in (make sure there's room for expansion). If you can preheat it in the oven before adding the loaf even better. Use it in exactly the same way as I describe for the Dutch oven.
When it's put in the oven a loaf of bread has only about fifteen to twenty minutes to rise to its maximum capacity before the crust develops and stops it from rising anymore. By giving it the highest heat possible, you give the wild yeast and the carbon dioxide they produce the best possible chance to force the bread to increase in volume before that window of opportunity is up. This results in great oven sprin,g which means the loaf swells up to maximum capacity and looks better, and also ensures that the crumb is light and fluffy.
Steam and the heat and moisture it creates extend the window of time your loaf has to rise and achieve good oven spring before the crust sets because it keeps the dough's surface moist and flexible for longer. It also helps create a beautiful, golden colour because steam settling on the surface of the dough dissolves the natural sugars. Then once the steam evaporates, those natural sugars caramelize, creating a deep, golden colour and a crispy, crackly, blistery crust.
Stretching and folding dough adds strength and develops the gluten in a much more gentle way than kneading. During bulk fermentation, which starts as soon as the dough is mixed, gas bubbles are building up in the dough. Stretching and folding enable you to develop the gluten in the dough and give it strength without removing that precious gas buildup.
Scoring is important because it creates an intentional weak spot on the surface of the loaf. This weak spot gives the loaf room to expand as it puffs up and cooks through in the oven. By scoring, you will get greater oven spring, and your finished loaf will be lighter and airier. It makes it look pretty, too!
As bread cools, the crumb firms up and dries a bit. If you cut the bread before this process has happened (while it's hot or even warm), the crumb will appear doughy and a bit gummy and it won't slice well. Let it cool properly, and your slices will be fluffy and airy as they should be. When cutting while hot/warm, you also let the steam trapped inside out rather than letting it dissipate and absorb naturally and slowly. This sets you up for bread that stales much quicker. Bread develops flavour as it cools too, especially in the case of sourdough, and after all of the time and effort you put into making it, it's important you get the best flavour possible.
No, don't wash your banneton. Over time, it becomes seasoned. Once your loaf is in the oven, simply shake out the excess flour (I hold mine upside down over my compost bin and give it a few sharp taps), then place the banneton on the stovetop to dry out with the heat from the oven. Then store in the cupboard until next time.
Simply enter your email in this form.
Recipe

Vegan Sourdough Bread
Author:WATCH HOW TO MAKE IT
Ingredients
The only way to get accurate and consistent results is to weigh your ingredients with a digital scale.
- 100 grams sourdough starter (100% hydration) , fed and at peak
- 295 to 320 grams room temperature water , 295g makes shaping really easy, so is good to start with, then gradually increase to 320 as you get more experienced.
- 475 grams bread flour or if in North America, all-purpose flour as long as the protein content is a minimum of 13-14%
- 10 grams fine sea salt , not table salt
- rice flour for dusting
INSTRUCTIONS
- Mix the dough - Whisk or mix the sourdough starter and water together in a large mixing bowl until the lumps of starter are broken up and the water looks milky and frothy.
- Add the flour and the salt. Mix it all together really well with a spatula, a wooden spoon or clean hands until you can no longer see any dry flour. Make sure you scrape right down into the bottom of the bowl and along the sides so every little bit is incorporated. If you have time, keep working the dough for about 10 minutes. This really helps strengthen your dough.
- Rest - Cover the bowl with a lid or a damp, clean dish towel (run it under the tap and wring it out) and leave it on the counter for about 1 hour.
- Stretch & folds - Now it's time to stretch and fold the dough. Get a spray bottle of water or a small bowl of water big enough to fit your hands in. We will be doing 3 sets of stretch and folds. Don't worry, this is much easier than kneading and only takes a minute or two each time.
- SET 1 - Place your bowl of dough in front of you on the counter. Uncover it. Wet your hands. With the dough still in the bowl (you don't need to take it out), cup your hand under and grab the dough from the side directly opposite you. Pull the dough up, stretching it gently out and upwards, then fold it over onto itself towards your body. Then turn the bowl a quarter of a turn, grab the dough on the side farthest from you, stretch it out gently and fold it over on itself. Work your way all around the dough until you have done this 10 times. You will notice that it gets a little tighter and more ball-like as you go. Turn the ball of dough upside down so its smooth side up, cover and leave again for 1 hour. See my video of stretch and folds in the body of the post above. A NOTE RE THE STRETCH AND FOLDS - While doing the stretch and folds, you do not have to be exact about the resting time between. An hour between each is just a guide. If you're busy, it's ok to do one 30 minutes early or an hour late. The important thing is that you get them all in at some point while giving the dough some time to relax between each one.
- SET 2 - Do another round of stretch and folds just like before but this time you should only need to do about 6. Carry on as many as you can before the dough feels too tight to do any more. You should feel a difference in the dough this time. It will be noticeably more elastic. When finished, turn the ball of dough upside down so it's smooth side up, cover and leave again for 1 hour.
- SET 3 - Do one more set of stretch and folds. You will notice that the dough feels smoother and tauter, and a little tougher to stretch and fold. Do as many as you can before it gets too tight to do any more. It will probably be less than last time. When finished turn the ball of dough upside down so it's smooth side up, cover and leave on the counter again.
- Windowpane test - After a short rest to let the gluten relax, do the windowpane test. I've included a video in my post above, but basically, you need to pull and stretch a bit of dough up and out of the bowl really gently and slowly with your fingertips. Keep stretching it, and if it is strong enough, you should be able to stretch the dough so thin you can see light through it like a window. If it keeps tearing, wait 20 minutes and do another round of stretch and folds.
- Bulk ferment - The time the bulk fermentation takes is very dependent on your individual environment, dough temperature, and the strength of your starter, so you will need to be flexible and use your intuition. As a guide, though, in my kitchen, which is about 21 °C (70 °F), the bulk fermentation (after stretching and folding has been completed) takes about 6 hours. I recommend letting it increase in volume by about 70 to 75% at first (not double), then you can adjust that percentage up or down as necessary to dial it in for future loaves. This is because it takes your dough a few hours to cool down once it's shaped and put in the fridge for its cold retard. If you let it double in volume before shaping, it will overproof in the fridge.Using a clear, straight-sided container or a container with measurements on it makes knowing when it's reached 70-75% a lot easier (see my equipment recommendations in the post above). Instead of being just a tight mass like when you left it, it should be well domed, look shiny like satin, not feel sticky if you touch it with dry hands, have bubbles all the way through but not necessarily on top (check the sides and underneath), be a bit jiggly when you wobble it, and if you gently pull the dough away from the sides of the bowl it should come away cleanly.
- Preshape - At no point should you punch your dough down like you might with regular yeasted bread! You need to preserve as much of the gas build-up as you can by treating it very, very, gently. Turn your dough out and onto your counter. It's a low-hydration dough, and if bulk fermented properly, the dough will fall slowly and cleanly out of the bowl and shouldn't stick to the surface. I don't recommend dusting with flour, or you won't be able to shape effectively. Very gently use your dough scraper or hands in a push and pull motion to get the dough into a rough ball. Place your now-empty mixing bowl upside down over the dough ball and leave it to rest for 30 minutes.
- Prepare your banneton - Dust your banneton or towel-lined bowl liberally with rice flour.
- Final shape - Dust your work surface with a very light dusting of flour and keep a portion of your counter flour-free. It's important not to use too much flour. Turn your dough ball upside down onto the floured surface. A bench scraper is ideal for getting under it and flipping it over. Now we will do a caddy clasp (the easiest way to shape your sourdough). Pick up your dough ball so it's resting on both of your hands, and fold it in half like a book. If making a batard (oval loaf), that's it. Plop it into your floured banneton seam side up. If making a boule (round loaf), once folded, gently rest on your counter and pinch the seam shut all along so it kind of looks like a Cornish pasty then pick up in both hands again and fold again the other way like a book then plop into your banneton. There is a video of me doing a caddy clasp in the body of the post above.
- Tighten things up - Pinch the seam shut all the way along. To make it really tight, you can gently stretch up and over the sides of the dough and pat, stitch, or pinch it together to form tension. I've included a video of me doing this in the post above. Dust the top of the dough with rice flour and rub it in gently.
- Cold retard - Cover your banneton with a banneton cover or plastic bag and put it in the fridge for anything from 10 to 36 hours.
- Prepare to bake - Preheat your oven (with your Dutch oven inside) to 475 °F (250°C). Once preheated, cut a square or rectangle of parchment paper big enough to turn your dough out with excess to lower into your Dutch oven. Remove your bread from the fridge. Place the parchment paper over the top of the banneton, place your hand on top then carefully flip over to turn the bread out. Score with one or 2 long, very deliberate and quick cuts with a razor blade, lame, or very sharp knife to a depth of ½ to ¾ inch.
- Bake - remove the Dutch oven from the oven. Remove the lid and carefully drop your bread in. Put the lid on and bake for 20 minutes. After 20 minutes remove the lid, and turn the temperature down to 425°F (218°C) and continue baking for another 20 minutes or until deeply golden brown and the internal temperature reaches 200 - 210°F (93-99°C). When tapped on the bottom with your fist, it should sound hollow.
- Cool - Remove the loaf carefully from the Dutch oven and place on a wire rack to cool. For the best crumb, allow it to cool completely, but if you can't wait that long, leave it for a minimum of 90 minutes. Slicing too soon will result in a gummy, sticky crumb.
NOTES
💌 SAVE THIS RECIPE!
Watch out for more tasty treats coming your way! Unsubscribe at any time.

Barbara says
I bought a Brod & Taylor bread proofed. I want to use it to proof my sourdough bread. What do I have to do differently from the recipe above as far as proofing is concerned?
CB Viau says
I haven't made this recipe yet but I am eager to try. Question: can I bake the bread in a glass oval bowl and cover with foil to bake?
Melanie McDonald says
Glass doesn't radiate heat well so I don't think that would turn out well. Also you'd need to be very careful the glass can take the necessary heat. I wouldn't think it would be safe over 450°F. You'd be better off baking it on a baking tray with a large metal pan/pot/bowl over the top of it. Or even inside a metal casserole/soup pan if it's big enough. It will also work well baked on a preheated pizza/bread stone with a metal pan on the shelf below (preheated with the oven). Slide the bread onto the stone, then immediately pour a good couple of handfuls of ice into the preheated metal pan then shut the door. Hope that helps!
Hanna Kaz says
Starter recipe was okay as followed on here, but my dough was jiggly like a pancake all the way to the end. It was all terrible and the dough wouldn't form. What a waste of time not for all I guess
Melanie McDonald says
Jiggly dough is a good thing when it comes to sourdough. It means it's full of air bubbles. But obviously flat as a pancake is not. It could be caused by many things or a combination of more than one: starter not ready to bake with yet, flour that doesn't have a high enough gluten content, not measuring the flour and water etc accurately with a digital scale, not developing a good gluten structure through stretching and folding, and/or it was over fermented or simply not given enough time. It's impossible to say without more information. Over-fermented dough will become very sloppy, sticky, and wet though, as will dough that has had too much water added, or has not been stretched and folded well enough or given enough time.
Sourdough bread is a learning curve and takes a lot of practice. I can assure you this recipe does works perfectly though, it's just that with sourdough a recipe is a guide and you also need to use your intuition, instincts, and experience too. All of that takes time to get right. My biggest tip is to stick to one recipe and keep practicing over and over again until you get it right. You'll gradually develop the skills needed to get a great loaf. Hope that helps!
Larry Hodel says
Is there any difference if you use bread flour that is not organic? The stores seem to carry King Arthur Bread Flour but it doesn't say organic on the front of the package. After months of research I've decided to use your recipes for sourdough bread and starter. Thanks for your help!
Melanie McDonald says
I'm not familiar with King Arthur flour but I don't use organic flour often, especially right now with prices being like they are for everything. Any bread flour will work fine, but like anything you do tend to get what you pay for and there is no doubt that better flours do produce better more flavoursome bread. Just use the best brand you can afford.
As for the sourdough starter you need to be a little pickier with the flour for that. It should be a good quality rye flour. The better the flour the more nutrients it has for the bacteria to eat and the better and stronger your starter will be. I just Googled King Arthur Rye Flour and it looks fine. Just make sure it's the 100% rye one and not the rye blend. Hope that helps!
Larry Hodel says
Perfect....God bless and have a happy New Years!
Sierra says
Hi Melanie,
I followed your no discard recipe fairly successfully, thank you for posting it! QUick question about the stretch and fold steps. For the first set, when you say 10, do you mean 10 individual folds, or 10 times that you go around the bowl, e.g if you go around the bowl once with 4 folds, you do a total of 4x10=40? Sorry, finicky mathematician here, and I couldn't tell which you meant!
Melanie McDonald says
Individual. It doesn't need to be exact though. You can just keep going around until it feels nice and tight. There usually comes a moment when you can't do it anymore because the dough is really taught. At that point stop and let it rest again. Hope that helps!
Jose says
Thanks for the sourdough bread recipe. One more for my sourdough bread recipe collection. I have made this type of bread for years. More than passion, it is love that I feel when I bake this bread. I am not a perfect baker; far from it. But I enjoy every bit of it. I even grind my own- flour, using my NutriMill Classic model: HS4.3 which is broken as I speak. I replaced its bearings not long ago, and this time the motor brushes are worn out. My frustration is that I can not find the exact size of brushes required for this grain mill. So I am not going to have sourdough bread for a while. Happy baking.
Pam Schinke says
Love the direction given each step of the way. I am new to baking bread and need all the help I can get
I doubled this batch and hope I didn’t mess it up by replacing 1 c of bread flour with whole wheat. and dividing the dough after the bulk rise before pre-shaping.
It’s in the frig now to retard proofing until morning.
Cross your fingers. This is my 20th sour dough batch and they get a little better each time I try a new recipe but have only used the whole wheat in this recipe and the last one I did.
I would like to know if you have punters on using part WW Flour and part bread flour and far as water to flour ratio and what differences should I look for in the hand kneading,, bulk rise and proofing?
My family love the flavor of the last loaf but it was quite dense!
Melanie McDonald says
Even after over 20 years of baking sourdough my loaves still improve every time. It's a constant learning process!
I always advise people not to use WW flour in their bread/sourdough until they are getting pretty much perfect results with regular white flour. It's a hard technique to perfect anyway, and WW just makes it harder so you've set yourself up for a challenge!
WW does require more water. Usually about 10 to 15% more (so if you're adding 1 cup of WW you only need to use an extra tablespoon of water). It also takes longer to absorb the water so after the initial mixing it might need a little longer to rest.
Personally I never knead sourdough. This recipe uses the stretch and fold method which gives much better results and makes for a much stronger dough which is necessary for great sourdough. This will be even more important when using wholewheat which will make the dough stickier. The stretching and folding and stronger dough will also make your bread much less dense because of the extra strength and the trapped air.
Something to bear in mind too is that using wholewheat speeds up the proofing process because it contains more food for the starter. As you are only using 1 cup it probably won't make too much difference but it's worth keeping an eye on.
Hope that helps!
Robin says
Hi, I’m on day 4 of the starter, I’m using whole wheat. I always get a hard skin on top of the starter which I take off and then proceed with the feeding once a day. Why dies it make a skin?? I have to top on so don’t understand why it is drying out. Your thoughts please?
Guylaine says
This is by far the best sourdough bread recipe and instructions I came across and they yield a perfect bread every time. I've used a 9 inch round Banneton in a regular cast iron dutch oven, and am now trying to use a 10 inch oval Banneton in a different enameled cast iron hoping that'll work as well. The baking schedule provided is the best to plan ahead, taking the guessing game away. Thanks Melanie, very much appreciated.
Melanie McDonald says
You're welcome. I'm really pleased you're enjoying the recipe and that the baking schedules are helpful!
Guylaine says
Quick update on the 10 inch oval Banneton and enameled cast iron. Worked out just as perfectly so I can now make a bread that is easier to slice for sandwiches.♥
Eileen says
What size Banneton Bread Proofing basket do I use? I bought the 9 inch but it looks too small. Thank you!
Melanie McDonald says
9 inch is fine. I just checked and mine are all 8.5 inches. I've never had a problem with them being too small for this amount of dough. Yours will be good.
Martina Williams says
I've used this recipe twice now with fabulous results. It's accurate, well written, and answered pretty much every question I had as I went through the process. The resulting bread was moist inside with a good crusty exterior and overall a great chew. I couldn't be happier. Thank you Melanie.
Donna Falco says
Thank you so much for posting this amazingly detailed, never-fail recipe! I am late to the party when it comes to sourdough, I know a lot of people took up baking during the past couple years. But thanks to you I am obsessed! Getting a scale was a game changer. I have made this at least two dozen times and my family now gets upset when they see "Bread Pitt" in the fridge instead of on the countertop! Thank you, thank you, thank you!!!!!!
Donna Falco says
Oh - and I forgot to mention. Instead of a boule I've been making a batard (loaf) shape and baking in my covered stoneware enamel chicken roaster so we can use it for sandwiches. It's got the perfect crust!! I'll never go back to store-bought bread!
Marie says
Fabulous recipe and instructions. So clear. Thank you Mel!
Marie Altman says
I've made this recipe 4 times now and it turns out beautifully each time. I'm always surprised and happy that it rises with a beautiful crust. I've never baked bread before. The starter took me a good two months to make; it just never rose and I didn't rush the process. Now I have a beautiful starter that responds within hours of feeding it starting with only one Tablespoon in the jar.
Marie Altman says
Thank you Melanie, I'm guessing the baking time will be a little less than the one big loaf? I have an oblong pyrex with lid that will fit two small nicely side by side.
Marie Altman says
With two small loaves, should I bake covered for 15 min at 475-500 degrees, remove the lid and bake another 10-15 minutes at 450? I follow your recipe to the "t" for the one large loaf.
A Virtual Vegan says
Yes, keep the temperature high to start because that gives you good oven spring, and keep them covered for 15 mins, then uncover and reduce to 450 and keep them in until they crisp up and sound hollow if you knock them on the bottom.
Heather says
Marie- I don't think my starter is ready and saw your comment. So you fed your starter about every day for 2 months until it was ready?
A Virtual Vegan says
Everyone's starter takes a different amount of time but if you are following my starter recipe it shouldn't take 2 months. When using that method and using rye flour as I recommend it never takes me more than a week or two.
Marie Altman says
Heather, I actually threw it out (or actually used it for pancakes and focaccia) and started over three times.. I don't remember how long the successful batch took to become successful, but probably at least two weeks. I didn't give up for months. I followed the recipe exactly from July until late October, and finally got a beautiful starter which I have baked with since then. I just wasn't going to give up. I don't know what was wrong, but it was worth it to keep trying. I'm wondering if using water from my Zero water filter was the culprit. I use tap water now. I follow Mel's directions to the "t" and get a beautiful loaf every time, and always amazed that I do.
Etta says
Brilliant and easy. I've followed this recipe and got perfect bread every time. However, I tried to move away from it once using half strong white and half strong wholemeal flour and adding seeds, and the result was underwhelming. Any tips on how to adjust this recipe for wholemeal seeded sourdough loaf?
Melanie McDonald says
So pleased you're enjoying the recipe! When adding in some wholewheat flour you will need to add more water. If you don't the rise and texture will suffer. Wholewheat is a lot more absorbent. It varies depending on the flour and how much you use but usually 5 to 10% more water. Hope that helps!
Etta says
I forgot to mention: I have done as you said and it works beautifully. It doesn't come out a perfect boule shape like with white flour only, but it is still nice and aerated and it tastes great. I have done it about a dozen times and it's always a success. Thank you.
Linda says
I love this recipe for the timeline!!!!! It would be so much more useful if my timeline printouts had the measurements on it instead of just "the flour, etc. Thanks for making this easy. My bread is delicious and crusty now.
A Virtual Vegan says
Thank you. I'm glad you're enjoying the recipe. You can print the recipe to go along with the timeline printout. There's a "print this recipe" button right at the top of the page and another down in the recipe card. Hope that helps!
Madeline says
I've made this recipe 4 times now. Turns out great! I have no previous bread making experience (beyond a bread machine, ha!), and I was able to get a good loaf from the very first time. I used a colander with a towel for a proofing basket and a dutch oven to bake it and the crust came out great. I did not have a bench scraper either when I first started and it came out fine, though I've since bought one due to my growing sourdough addiction. Now I've tried to convince everyone in my family that "it's not that hard, you should try!", but I've become the designated baker instead.
A Virtual Vegan says
I'm really pleased you're enjoying the recipe Madeline and thanks so much for taking the time to leave a review/rating. It's much appreciated!
Sharon says
I really like how you make sourdough bread feel doable. I had felt too daunted by other recipes. I 'cheated' and mixed the dough in the bread maker, I
left it to rise for a few hours and cooked it on a pizza stone. The results were great-thanks for the recipe. I'm going to experiment swapping in 100g wholemeal bread flour next ?
A Virtual Vegan says
I'm glad you found the recipe approachable Sharon. Thank you!
Annie says
Hi Melanie, I am making this and at the moment my bread is is in the fridge as I wish to bake it today. Your instructions are fantastic and I am so happy to have found your site. At this stage I don’t have a banneton basket and wondered if instead of using a linen flour drenched cloth if I could just line a bowl with baking paper for proving and then just lift this out and place into the Dutch oven for cooking. If I did this I wouldn’t flip it over so would put it to prove seamside down. What do you think? Thanks so much. Cheers annie
A Virtual Vegan says
Hi Annie, I have tried it with baking paper a long while ago and the paper absorbed the moisture from the bread and got really soft and fell apart when lifting it out. It ended up ruining my loaf. It might have been my paper but I haven't wanted to risk it again. Maybe 2 layers might help? It could also have been because my recipe at the time had quite a high hydration level and I left it a bit too long perhaps? I'm not sure. It's up to you if you want to risk it!
Tiffani says
Well I managed it. I followed your instructions as much as possible. I have a large oven-safe stainless steel stock pot that I used successfully instead of the Dutch oven. I had ALOT of trouble with the final shaping,but I think that just takes practice. I got the starter going in about 10 days. I forgot to feed it a couple times. I ended up just calling it the "roommate" because it was just hanging around and constantly needing food. I ended up having so much it was reaching the top of the jar. I saw that your recipe was delayed(understandable)and I decided to just wing it and try to make something. My first loaf was a weird,flat and dense brick that my son candidly said tasted like a stale cheese cracker(he then felt bad for saying it,but we just laughed because it really did). Then the next day,I fed the near empty starter again and it bubbled up beautifully the next morning. I was able to make not just a decent loaf of bread,but I made some awesome tortillas with what remained in the jar. Ironically,right before the onset of the pandemic, I was about to research making sourdough because I discovered that all the commercial leaveners we use are not naturally obtainable. My goal is to one day be able to make everything my family needs the natural way,at least as much as possible. I looked into many other sourdough recipes and yours is the best I've found for my purposes thus far. No waste and manageable instructions. I love it. I was also disappointed to see that most so called discard recipes call for commercial leaveners as well as the sourdough. That seems counterproductive to me. The tortilla recipe I made called for starter and baking powder. I left the baking powder out and they bubbled up more than my usual recipe that uses baking powder. Thanks for making this fun and achievable for beginners and God bless you!
A Virtual Vegan says
Ha ha, I'm glad you and your "roommate" are getting along! Shaping does take practice. You'll get better and better each time though, as will your bread.
It sounds like you're having fun and enjoying the process which is great. Thanks Tiffani!