

Use your sourdough starter to make some delicious sourdough dog biscuits for your dog. This recipe can be made with sourdough discard or active starter and has been thoroughly taste-tested and very much approved by Charlie and Chester!
No sourdough starter? Make some peanut butter banana dog treats or sweet potato dog treats for your pup instead!

💌 SAVE THIS RECIPE!
Watch out for more tasty treats coming your way! Unsubscribe at any time.
Calling all the dog-loving sourdough bakers!
Charlie and Chester have always gone nuts every time I feed my sourdough starter and absolutely love to snack on the odd sourdough bread crust, so it was only a matter of time before we got to work on a sourdough dog biscuit recipe.
Although eating raw sourdough starter is dangerous for dogs, when it's cooked, it's perfectly safe and has the same gut-friendly benefits for them as it does for us, so they were very excited to get to work.
The boys sacrificed their time and taste buds to rigorously taste-test this recipe into existence. Then, once it passed their seal of approval, we asked our friends and neighbours' dogs to taste-test it too.
We can now 100%, paws on heart, confirm that dogs everywhere think these are the best sourdough dog biscuits. They absolutely love the tangy taste!
What's more, they are super easy to make, last for months when stored in a sealed container, and you can use active starter or sourdough discard to make them.
Mel x
Fermentation Tip
Note that you can make and bake these sourdough dog treats right away, or for an extra tangy flavour, which dogs love even more, you can leave the unbaked cookies in the fridge to ferment for a couple of days before baking. As with baking sourdough bread, extra time develops the flavour further, making it tangier and more flavoursome. Charlie goes absolutely wild for these cookies when I do this!


Sourdough Dog Biscuits
Author:Ingredients
- 2 cups (180 grams) rolled, old-fashioned, or quick oats , or oat flour
- 1½ cup (390 grams) sourdough starter , active or discard
- ½ cup (120 grams) natural peanut butter , with NO additives (important - see recipe notes)
- ¼ cup (60 ml) melted coconut oil or olive oil , or the same amount of applesauce, mashed banana, or pumpkin puree
- 1 teaspoon ground cinnamon
- 1 cup (130 grams) whole wheat flour , plus more for dusting
- water as needed
INSTRUCTIONS
- Add the oats to a food processor or blender and blend until a coarse flour consistency. Skip if using oat flour.
- If using a food processor, add everything else to the bowl (except the water) and process and pulse until really well combined. The texture will very much depend on how stiff or drippy your peanut butter is and the hydration of your sourdough starter. If it looks dry and crumbly, add a little water a tablespoon at a time until it will squeeze together into a cohesive dough. If it's a little sticky, add a little more wholewheat flour a tablespoon at a time, to form a cohesive, slightly tacky dough.
- If you aren't using a food processor, set the blended oats aside and to a large mixing bowl, add the sourdough starter, peanut butter, oil, and cinnamon. Mix to combine, then add the blended oats and wholewheat flour. If it feels dry and crumbly, add a little water a tablespoon at a time, until it will squeeze together into a cohesive dough. If it's a little sticky, add a little more wholewheat flour a tablespoon at a time, to make a stiff, very slightly tacky dough.
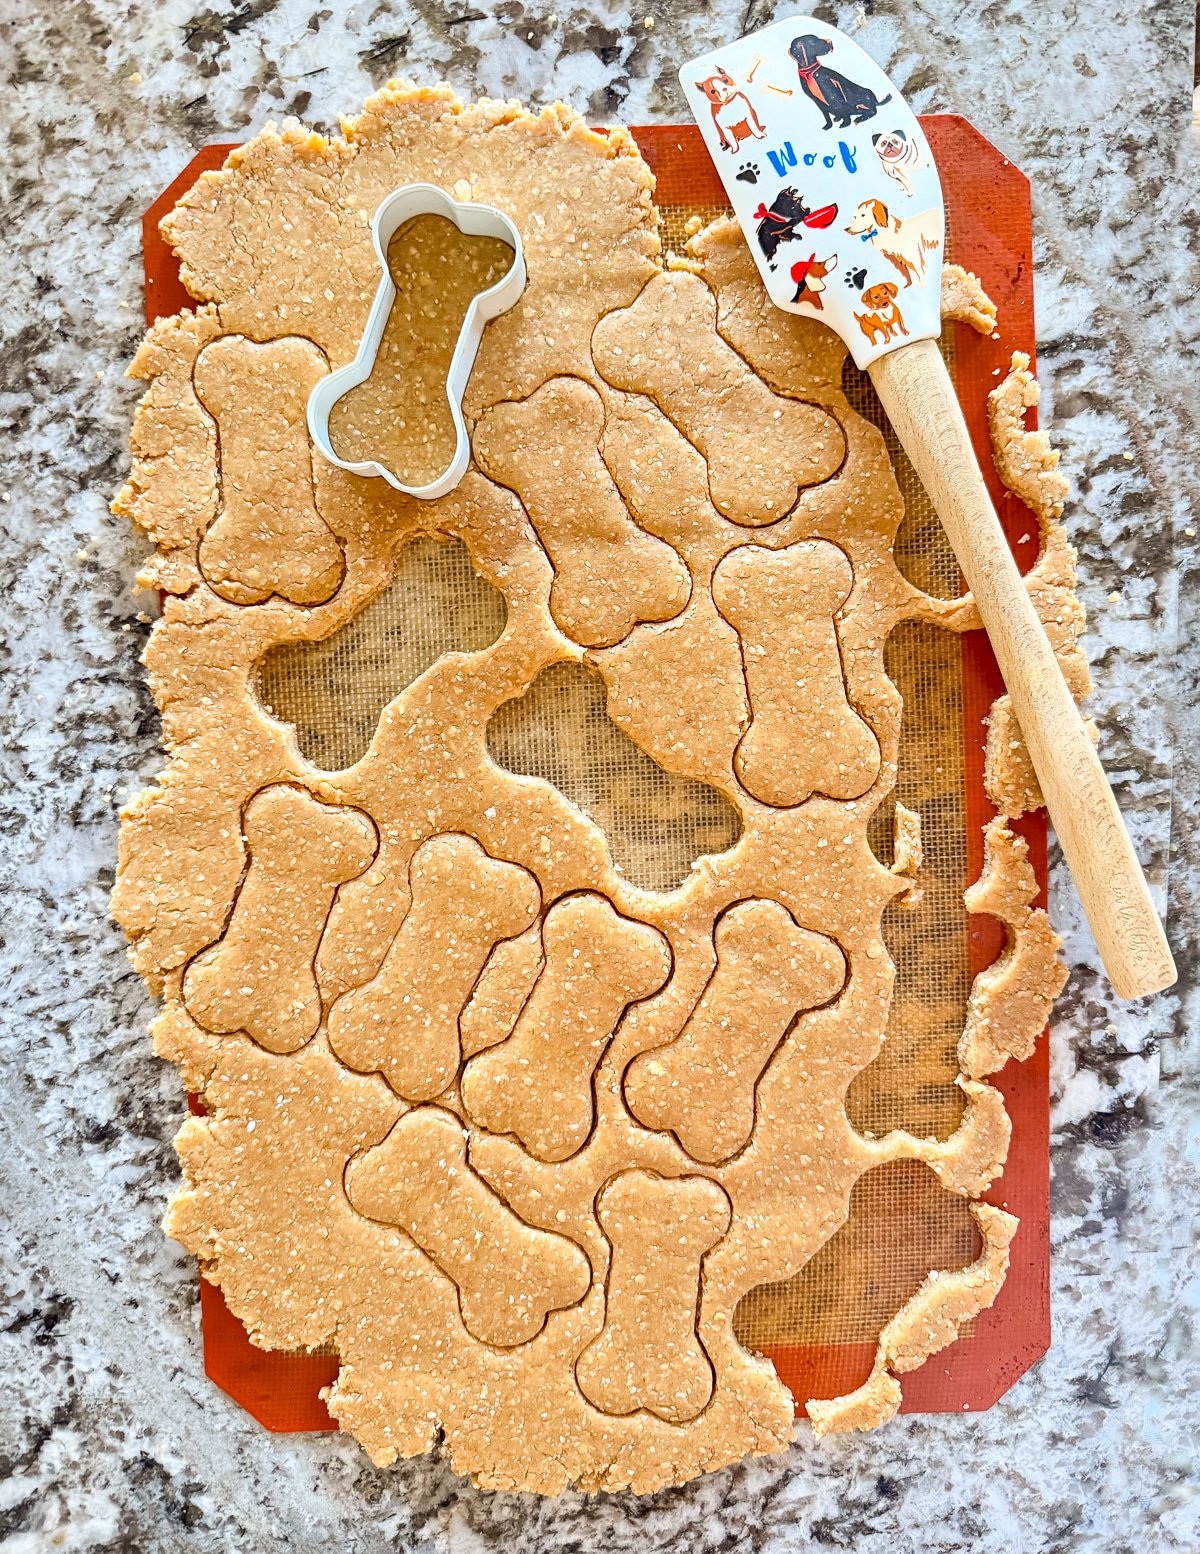
- Turn out onto a floured surface or a silicone baking mat and roll out with a rolling pin to about 3 to 4 mm thick. Dust the surface with a little flour if the rolling pin sticks.
- Cut into shapes with a cookie cutter or use a pizza cutter to cut into squares, and place on a large lined baking tray. Re-roll as necessary to use every last bit. The number of cookies you get will depend on the size of your cutter.
- You can either bake the cookies right away, or if you have room in the fridge, cover tightly and refrigerate for up to 48 hours so they ferment a bit more and get extra tangy.
- Bake at 350°F (175°C) for about 25 to 28 minutes on a light-coloured baking tray, or a few minutes less on a dark tray. Try to catch them when they feel hard and are lightly golden on the bottom.
- Cool completely on the baking tray. Store in an airtight container for up to 3 months or freeze for up to 6 months.
NOTES
💌 SAVE THIS RECIPE!
Watch out for more tasty treats coming your way! Unsubscribe at any time.
Judy says
Oops meant 5 stars. Actually it really 8 stars but the visual only allows 5. Thank you for this well needed recipe.
Judy says
Our pets love these nutritious snacks. Homemade is always healthier and fresher and these ingredients means a few extras cookies wont hurt when someone is pleading