Sourdough Starter Recipe
Author:Learn how to make a sourdough starter the easy way. You will learn all about what a sourdough starter is, what you need to make one, how to make it without endless feedings and wasteful discard, and why the whole process doesn’t have to be as difficult and time consuming as you think!
Ingredients
- about 175 grams (1¾ cup) rye flour * (plus more as necessary) - please measure in grams if at all possible - see under heading "Why measure in grams and not ounces or cups?" in post above for more info.
- 175 grams (½ cup + 3 tablespoons + 2 teaspoons) room temperature water , (plus more as necessary) (please measure in grams if at all possible).
INSTRUCTIONS
- Please start by reading my post above. It's long, but it includes lots of important and useful information that will help you succeed.
- IMPORTANT - I do not recommend using cups/tablespoons to make this starter because they are not accurate enough.
- ALSO IMPORTANT - At no point in this process should you discard any of the starter.
- Day 1 - To a clean jar/container that's between 750 ml (25 oz) and 1 litre (34 oz) in size, add 25 grams (3 tablespoons + 2¾ teaspoons) of rye flour and 25 grams (1 tablespoon + 2 teaspoons) of room temperature water. Mix well so you can't see any dry flour, level it as best you can and cover with the jar lid. Screw it on loosely but don't fully tighten it up. Don't screw the lid on tightly. If you have an elastic band, put it over the jar so it is level with the top of the flour/water mixture. That way you can see easily if there is any increase in volume. Leave the jar in a sheltered spot for about 24 hours, ideally at a temperature of between 20°C (72°F) to 26 °C (80°F) If your kitchen is very cool see my tips in the post above for how to keep your starter warm.
- Day 2 - There probably won't be any changes yet but you might see a few bubbles and/or notice a milky smell. Open the jar of starter and add another 25 grams (3 tablespoons + 2¾ teaspoons) of rye flour and 25 grams (1 tablespoon + 2 teaspoons) water. Mix well so you can't see any dry flour, level it as best you can and cover loosely with a lid, adjust the elastic band so it's level with the top of the mixture and put the jar back in it's spot.
- Day 3 - You might see and smell some changes now. Maybe a few bubbles and a fruity smell. Open the jar of starter and add another 25 grams (3 tablespoons + 2¾ teaspoons) of rye flour and 25 grams (1 tablespoon + 2 teaspoons) water. Mix well so you can't see any dry flour, level it as best you can and cover loosely with a lid, adjust the elastic band so it's level with the top of the mixture and put the jar back in it's spot.
- Day 4 - You will likely see more bubbles today and it could be increasing in volume. Don't get excited and think it's ready to use yet though. Sometimes this happens, then the activity will stop again for a few days, so keep going for now. Open the jar of starter and add another 25 grams (3 tablespoons + 2¾ teaspoons) of rye flour and 25 grams (1 tablespoon + 2 teaspoons) water. Mix well so you can't see any dry flour, level it as best you can and cover loosely with a lid, adjust the elastic band so it's level with the top of the mixture and put the jar back in it's spot.
- Days 5 to 7 - Keep feeding it 25 grams (3 tablespoons + 2¾ teaspoons) of rye flour and 25 grams (1 tablespoon + 2 teaspoons) on days 5, 6 and 7. It should be pretty active and smell pleasantly sour and fruity by now. If by day 7 it has been rising to twice its volume then falling again after each feeding for a few days in a row then it is ready to use for baking bread. If it hasn't been rising to twice its volume consistently after feeding, just keep feeding it 25 grams (3 tablespoons + 2¾ teaspoons) of rye flour and 25 grams (1 tablespoon + 2 teaspoons) daily until it does. Ensure the area it is kept is between 20°C (72°F) to 26 °C (80°F) and no less to give it a boost. See the recipe notes for what to do if your jar starts to become more than half way full after feeding.
- Once your starter has been rising and falling consistently after feeding for a few days it is ready to bake with. Now you must name it and make it part of your family ;O)
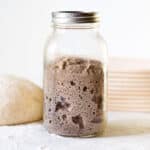
- You can use the starter to bake bread when it is at its peak (doubled in size) after feeding. Use what is in the jar for baking with and just leave behind a tiny bit of starter. A few teaspoons is sufficient, or what amounts to the scrapings in the jar. Pop the jar of scrapings in the fridge where it can stay until the day before you bake again. It does not need to be fed in between. The next time you want to bake, remove it from the fridge the evening before and feed it so it's ready and at its peak for you the next day.
NOTES
IMPORTANT - It really is best to use grams when making this starter. It is impossible to be accurate when using cups and tablespoons and teaspoons and ounces don't go small enough. But if you must use cups, spoon the flour into the cup/measuring spoon gently and level with a knife. Don't shake or compact it.
WHEN YOU WANT TO BAKE BREAD AGAIN:
If a week or less has passed since you put the jar of starter in the fridge – the night before you want to bake, read your recipe and see how much starter it calls for.
If it says you need 100 g of starter, put 50g (½ cup) of rye flour and 50g (3 tablespoons + 1 teaspoon) of water into your starter jar and stir it up really well. 50 g + 50 g = 100 g which is what you need for the recipe.
If the recipe says you need 300g of starter, put 150g (1½ cup)of rye flour and 150g (½ cup + 2 tablespoons) of water in your jar. 150g + 150g = 300g.
Get it? Then cover the jar and leave it wherever you keep it, until the next morning when it should be at its peak and ready to bake with. Take out all of the starter to use in your recipe leaving the scrapings in the jar and pop it back into the fridge for next time, then follow these directions again next time you want to bake. If 2 weeks have passed since you put the jar in the fridge – 2 nights before you want to bake, read your recipe and see how much starter it calls for. You are going to feed the starter over 2 nights to get it excited again.
If your recipe says you need 100 g of starter, put 25g ( ¼ cup) of rye flour and 25g (1 tablespoon and 2 teaspoons) of water into your starter jar and stir it up really well. Then the following night add another 25g of flour (¼ cup) and 25g (1 tablespoon and 2 teaspoons) of water. That brings you up to 100g of starter. Leave it until the next morning and it should be nice and bubbly ready to bake with.
If the recipe says you need 300g of starter, put 75g (¾ cup) of rye flour and 75g (5 tablespoons) of water in your jar and stir it up, then the following night add another 75g (¾ cup) of flour and 75g ( 5 tablespoons) of water, stir it up and leave it ’til morning when it should be ready to bake with. If more than 2 weeks have passed since you put the jar in the fridge – Don’t worry. If it’s only a few days over 2 weeks follow my directions above and you should be fine. If it’s much longer then you might need to feed it over 3 or 4 nights to get it raring to go again. The good news is that it’s pretty hard to kill it so no matter how long you’ve left it it should be salvageable (unless it’s moldy – see my FAQ below for more info on that). *FLOUR The flour you use must be rye flour and it must be fresh. Don't use a bag that's been sitting around in your pantry for 6 months or you'll be setting yourself up for trouble. The bacteria need nutrients to grow so you'll have a hard time getting it going and a strong chance of mold appearing at some point if you use old flour.
I recommend using rye flour because it produces a hardier and more resilient starter that will be ready to use a lot quicker than other flours and that will be easier for a beginner to get going and maintain. It also copes really well with the unique maintenance regime of this recipe. Other flours will not. And don't worry, if you make a rye starter you aren't stuck with just having to make rye bread forever. It works fine for making any kind of sourdough bread with flour such as white or whole wheat. IMPORTANT NOTE Make sure that your starter never fills more than half of the jar when you have just fed it because otherwise, it could overflow when it increases in volume. That's why I suggest using a large jar. If it does though, simply remove most of the starter from the jar, just leaving a little bit at the bottom (about a tablespoon is fine), or transfer a tablespoon of it to a new clean jar and start feeding it daily with 25 grams (3 tablespoons + 2¾ teaspoons) of rye flour and 25 grams (1 tablespoon + 2 teaspoons) of water as before. The excess starter that you removed can be used in any sourdough discard recipe. I like to add it to the dough of regular yeasted loaves or pizza dough or I use it to make pancakes or waffles. You can also compost it.
NUTRITION
Serving: 350g | Calories: 611kcal | Carbohydrates: 132g | Protein: 19g | Fat: 3g | Saturated Fat: 1g | Sodium: 12mg | Potassium: 655mg | Fiber: 21g | Sugar: 2g | Calcium: 42mg | Iron: 4mg
